I have been on my veggie kick for a little over a week now and I am so excited to share a couple recipes that I have picked up. After doing a lot of research on vegetarian and vegan diets, I decided that it’s something I want to slowly adopt. I have tried the 30 day vegetarian challenge before and I craved meat like crazy! But this time is different. Want to know why? (start nodding your head because you know I am going to tell you anyway)I am cutting out the deprivation thoughts. That’s it! That’s my secret to living a healthy and happy lifestyle.
I was inspired by a blog my friend sent me recently (thank you to Laura Law) called “Oh She Glows”. I highly recommend you go and check it out, http://ohsheglows.com/. Angela's view on life and diet was truly inspiring and I decided that is what was wrong with my past diet trials. I openly went into my gluten free diet because I had to cut out gluten. It wasn’t a choice. But going vegetarian/vegan IS a choice. A choice that I can choose to carry out. If I want a piece of chicken for dinner, by golly I am going to have it! But to tell you the truth, in carrying on this perspective, I haven’t wanted it. Me, a turkey, chicken, occasional medium-rare steak lover DOES NOT want it. No cravings because there are no restrictions.
It’s been only a little over a week but I still want to give myself a pat on the back because I know this adopted way of living will bring me to what I want…you remember my resolution right? A Happy & Healthy Lifestyle.
Okay, dinner time. My temptation to try vegan options quickly turned into a Tempehtation when I was exploring whole foods vegan section. I love tofu and have cooked with it often but have never tried tempeh. Nothing against, just haven’t grabbed it. Like they say, don’t knock it till you try it! And try it you should! I am talking to you dear readers-meat lover or not.
So what exactly IS Tempeh?
“Tempeh originated from Indonesia, where it is still an important food. Tempeh is cake of soybeans, which have been de-hulled, cooked, mixed with a tempeh starter (culture of Rhizopus oligosporusor Rhizopus oryzae) and incubated for a day or two.
The white mycelium of the Rhizopus mold keeps the soybeans together to form a solid cake, which you can easily sliced.
In Indonesia, tempeh is traditionally made from soybeans only, but in Western countries you can find tempeh made from other ingredients, such as vegetables, grains or other beans. Since tempeh is made from whole soybeans, it is a fiber rich food. Tempeh is a rich source of proteins, minerals, soy isoflavones and saponins. It is also a generous source of nutrients such as calcium, B-vitamins and iron. IN addition, tempeh is a good source of monosatuarated fats and contains no cholesterol. The natural tempeh fermentation process also makes the soya more digestible. Tempeh has grown so much in popularity that it is now available in the refrigerated section of many supermarkets. Of course, you can also find it in health food stores oriental shops.” www.soya.be
Informative lesson over let’s talk food. I sampled two different marinated tempeh flavors from whole foods. I was meant to try it I decided because the packages were on sale 2/$6! Ah I love it when fate leads me to scrumptious adventures.
So hear are two recipes we tried out the last two nights. One using coconut curry tempeh
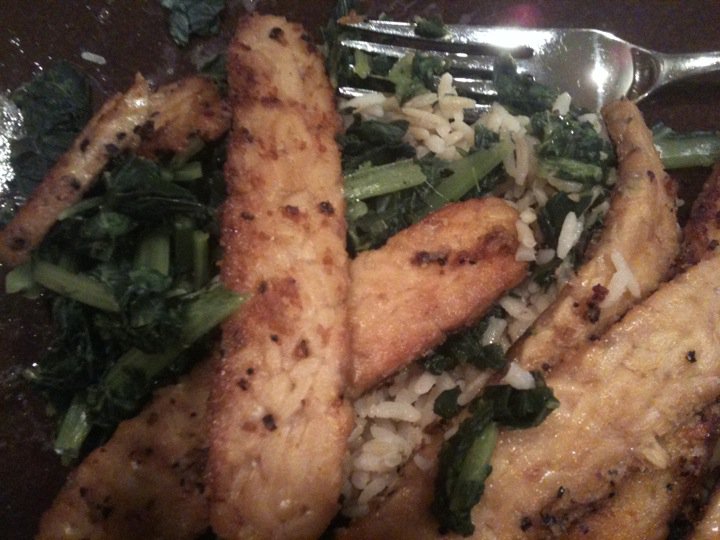
, the other lemon pepper tempeh.
Delicious, nutritious and delightfully easy to make! Let’s face it, most of us work late and we need a meal in under 20 minutes when we get home that isn’t delivered in a greasy box or plucked from the pantry in a can. Both these meals are well under 20 minutes. Take that Rachel Ray! My husband and I were delightfully full and content. Meat was not missed I assure you.
Coconut Curry Tempeh with Brown Rice Vegetable Medley
•1 pkg coconut curry marinated tempeh
•1 package Uncle Bens Instant Brown Rice
•2 cups organic frozen vegetables (lima beans, carrots, peas, green beans)
•2-3 tbs EVOO
I used a short cut and bought the instant uncle bens brown rice that comes measured out in 2 cup servings that boil on the stovetop quickly. Drain well and set aside.
Steam vegetable medley, drain well, and mix into rice. Divide onto two plates.
Heat EVOO in a pan until hot. Place tempeh into the pan and brown all sides, about 2 minutes each side. Place over rice & vegetable medley and enjoy!
Lemon Pepper Tempeh with Leafy Greens & Brown Rice
•1 pkg Lemon Pepper Tempeh
•2 cups 365 organic Leafy Greens mix (kale, collard greens, spinach)
•1 pkg uncle bens instant brown rice
•2-3 tbs EVOO
Steam your leafy green mix on the stove top. Drain well.
Cook your Rice and mix, drain well and mix with leafy greens. Divide onto two plates.
Heat EVOO in a pan until hot. Place tempeh into the pan and brown all sides, about 2 minutes each side. Place browned strips over rice and greens. Enjoy!
Showing posts with label gluten free marinade. Show all posts
Thursday, January 6, 2011
Tuesday, November 23, 2010
I’m Not Going Cold Turkey THIS Turkey Day!
I may be the only gluten free gal not shaking in her boots this year. I find it just as easy to enjoy myself on this holiday as I do every other day of the week. Why all the trepidation? I am probably less scared than the diet obsessed calorie phobic that lurks around every family. You know who I am talking about. The one that cringes with the crackle of freshly baked loaf of bread because of the carb content, or hides in the bathroom while slices of pie are being deliciously devoured. Resolutions are made at the beginning of the next year for a reason my dear readers. We work hard all year, and I think we need to reward ourselves! Being Greek, I have learned some wonderful lessons around the holidays. For instance, there are no calories on holidays. It’s true I tell you! Once you stop counting carbs and just enjoying your favorite delights, you’ll realize how miniscule a couple more ticks on that scale for one day can be. Plus, we all burn off half the cranberry dressing with a rousing game of football right?
Okay off my perch now. I am not saying to overindulge by any means by the way. Dig in with appropriate portions of course. If I can remain at ease on this holiday, I see no reason why you cannot. It’s after all, a holiday based on a feast!
So feast your eyes on
some good advice on keeping gfree guiltily below. I’ll keep you from hyperventilating at either the scale or the site of the potentially gluten gravy, and you just sit back and enjoy.
For my advice about a stress/gluten free Thanksgiving, I give you tips from my blog mentor herself, the glutenfreegoddess. I often get inspiration from her recipes, and she has had much more experience in the gfree world than I. She has written a great guide about where your gluten may be lurking. A bit from her blog below!
•Marinades and soy sauce, broth and bouillon may use wheat or barley in flavors and seasonings. Although I urge you to check your turkey for gluten-free status, most I've seen are safe- if you avoid the seasoning or gravy packet.
•For thickening gravy, whisk in a tablespoon or two of sweet rice flour or an arrowroot starch slurry. Potato flour is another choice- but be careful you don't add too much and end up with gravy you have to slice and serve. I like to add a splash of dry sherry, brandy, or wine to the gravy as well. It gives it that extra kick (and goddess knows, sometimes we need it- especially around the holidays).
•For stuffing, simply follow your favorite recipe and substitute toasted cubes of gluten-free cornbread or a loaf of store-bought gluten-free white bread. Or try my personal favorite stuffing recipe- Cornbread Stuffing with Curried Apples and Cranberries.
•For a crunchy bread crumb topping, try my Crunchy Gluten-Free Breadcrumbs (process toasted GF waffles- they make perfect golden crumbs).
•For a gluten-free mac and cheese try my Kicked Up Baked Mac and Cheese Recipe or my dairy-free Baked Mac and Cheese or my totally from scratch Cheesy Uncheese Mac and Cheese (fab for vegan guests).
•For a classic cookie crumb pie crust use Pamela's cookies (Lemon or Ginger or Chocolate, depending upon the filling) processed into crumbs; I use Joy of Cooking's classic cookie/cracker crumb recipe and simply substitute with gluten free cookies. For a butter replacement, try Spectrum Organic Shortening.
•For a gluten-free pie crust folks rave about, try Rebecca Reilly's Gluten-Free Pie Crust recipe with sorghum flour.
Read more: http://glutenfreegoddess.blogspot.com/2008/11/thanksgiving-recipes-tips-for-gluten.html#ixzz167Xdn3Mo
Okay off my perch now. I am not saying to overindulge by any means by the way. Dig in with appropriate portions of course. If I can remain at ease on this holiday, I see no reason why you cannot. It’s after all, a holiday based on a feast!
So feast your eyes on
some good advice on keeping gfree guiltily below. I’ll keep you from hyperventilating at either the scale or the site of the potentially gluten gravy, and you just sit back and enjoy.
For my advice about a stress/gluten free Thanksgiving, I give you tips from my blog mentor herself, the glutenfreegoddess. I often get inspiration from her recipes, and she has had much more experience in the gfree world than I. She has written a great guide about where your gluten may be lurking. A bit from her blog below!
•Marinades and soy sauce, broth and bouillon may use wheat or barley in flavors and seasonings. Although I urge you to check your turkey for gluten-free status, most I've seen are safe- if you avoid the seasoning or gravy packet.
•For thickening gravy, whisk in a tablespoon or two of sweet rice flour or an arrowroot starch slurry. Potato flour is another choice- but be careful you don't add too much and end up with gravy you have to slice and serve. I like to add a splash of dry sherry, brandy, or wine to the gravy as well. It gives it that extra kick (and goddess knows, sometimes we need it- especially around the holidays).
•For stuffing, simply follow your favorite recipe and substitute toasted cubes of gluten-free cornbread or a loaf of store-bought gluten-free white bread. Or try my personal favorite stuffing recipe- Cornbread Stuffing with Curried Apples and Cranberries.
•For a crunchy bread crumb topping, try my Crunchy Gluten-Free Breadcrumbs (process toasted GF waffles- they make perfect golden crumbs).
•For a gluten-free mac and cheese try my Kicked Up Baked Mac and Cheese Recipe or my dairy-free Baked Mac and Cheese or my totally from scratch Cheesy Uncheese Mac and Cheese (fab for vegan guests).
•For a classic cookie crumb pie crust use Pamela's cookies (Lemon or Ginger or Chocolate, depending upon the filling) processed into crumbs; I use Joy of Cooking's classic cookie/cracker crumb recipe and simply substitute with gluten free cookies. For a butter replacement, try Spectrum Organic Shortening.
•For a gluten-free pie crust folks rave about, try Rebecca Reilly's Gluten-Free Pie Crust recipe with sorghum flour.
Read more: http://glutenfreegoddess.blogspot.com/2008/11/thanksgiving-recipes-tips-for-gluten.html#ixzz167Xdn3Mo
Thursday, July 8, 2010
Grilled for a Grilling Recipe
RIP to my husband’s grill… ashes to ashes, charcoal dust to charcoal dust. Let’s take a moment of silence.
OKAY, now raise a glass to the new grill taking up residence on our side patio! Out with old, in with the new. I think grilling out is one of my favorite activities. It's bonding, fun do with both friends and family, and is such a simple way to get a healthy meal on the table that everyone will eat.Even my picky son was delighted with this dish.
Okay, okay so I don’t really do the grilling. My hubby thinks letting me around propane and an open flame would be a disaster but I design the menu and prep so I deserve some credit right? I am master at griddle grilling so I will keep that under my belt and let him deal with the more flammable fun.
My friends and family asked if we do much grilling at home, and what simple recipes do I have to share. The fourth must have given us a dose of grill fever. I made it a challenge to put together an easy 6 ingredient grilling recipe that was simple, but tasted complex in its flavors. Well, I think I have one that is as easy as it gets. I didn’t do extensive seasoning, it doesn’t involve a lot of ingredients or puttering around the grocery store franticly looking for a store bought gluten free marinade, and was on the table in 30 minutes. Excuse me for sounding like Rachel Ray there.
Marinated Grilled Chicken & Grilled Corn with Basil Butter
Ingredients
•2 large skin on chicken breasts (bone in or out is your preference)
•Daddy Hinkle’s Liquid Marinade (yes, it is gluten free!!)
•2 husks of white corn
•¼ cup yogurt butter
•¼ cup or so fresh basil
•Kosher salt
Directions
Marinated and Grilled Chicken
Poke holes on both sides of the chicken with a fork. This allows the marinade to soak into the chicken. Sprinkle kosher salt on both sides. Place chicken breasts in a freezer bag or dish, and liberally pour Daddy Hinkle’s onto the chicken. Let marinade for at least 4 hours. The longer you marinade, the better the flavor. This part can be done in the morning, and just sit and soak while you're at work.
Pre-heat the grill on med-high to high and lay the chicken breast on the grill. A hotter temperature will cook faster and sear in the juice if grilled correctly.
Grill for approx. 4-5 minutes on one side, checking frequently to make sure the chicken is not burning. The chicken is ready to turn when the bottom side has clear sear marks and the top still is pink. Flip and grill the chicken for another 4-5 minutes on the other side, depending how large the chicken cut. Firmly touch the chicken at the thickest point to see if done. If overcooked, the chicken will feel hard without any give. If undercooked it will feel a little squishy. If cooked right it should have a little spring back.
If you are unsure if the chicken is cooked enough you can make a small cut into the thickest part of the chicken. If the center is still translucent then it needs more cook time. You could also use a meat thermometer and make sure the chicken reads 165 F.
**The chicken will continue cooking after it is taken off the grill. This is when most people overcook, because they remove the chicken too late from the grill. Once it has cooked completely through it will start drying very fast.
Grilled Corn with Basil Butter
Peel back the corn husks, but do not completely remove, and clean the threads off the kernels. Tuck the corn back up into its husk.
Grill the corn in its husk for about 4 minutes on each side. Remove from grill and take out of the husks. Shave the kernels off into a bowl. Add Basil Butter (recipe follows).
Basil Butter
Chop your basil leaves. In a food processor, or with a hand blender, combine the basil and butter. Pulse until smooth, adding a little EVOO if needed. I used a hand mixer so it helped for the mixture not to stick to the blades. I know this technically adds one more ingredient but I am sure you can let it slide.
OKAY, now raise a glass to the new grill taking up residence on our side patio! Out with old, in with the new. I think grilling out is one of my favorite activities. It's bonding, fun do with both friends and family, and is such a simple way to get a healthy meal on the table that everyone will eat.Even my picky son was delighted with this dish.
Okay, okay so I don’t really do the grilling. My hubby thinks letting me around propane and an open flame would be a disaster but I design the menu and prep so I deserve some credit right? I am master at griddle grilling so I will keep that under my belt and let him deal with the more flammable fun. My friends and family asked if we do much grilling at home, and what simple recipes do I have to share. The fourth must have given us a dose of grill fever. I made it a challenge to put together an easy 6 ingredient grilling recipe that was simple, but tasted complex in its flavors. Well, I think I have one that is as easy as it gets. I didn’t do extensive seasoning, it doesn’t involve a lot of ingredients or puttering around the grocery store franticly looking for a store bought gluten free marinade, and was on the table in 30 minutes. Excuse me for sounding like Rachel Ray there.
Marinated Grilled Chicken & Grilled Corn with Basil Butter
Ingredients
•2 large skin on chicken breasts (bone in or out is your preference)
•Daddy Hinkle’s Liquid Marinade (yes, it is gluten free!!)

•2 husks of white corn
•¼ cup yogurt butter
•¼ cup or so fresh basil
•Kosher salt
Directions
Marinated and Grilled Chicken
Poke holes on both sides of the chicken with a fork. This allows the marinade to soak into the chicken. Sprinkle kosher salt on both sides. Place chicken breasts in a freezer bag or dish, and liberally pour Daddy Hinkle’s onto the chicken. Let marinade for at least 4 hours. The longer you marinade, the better the flavor. This part can be done in the morning, and just sit and soak while you're at work.
Pre-heat the grill on med-high to high and lay the chicken breast on the grill. A hotter temperature will cook faster and sear in the juice if grilled correctly.
Grill for approx. 4-5 minutes on one side, checking frequently to make sure the chicken is not burning. The chicken is ready to turn when the bottom side has clear sear marks and the top still is pink. Flip and grill the chicken for another 4-5 minutes on the other side, depending how large the chicken cut. Firmly touch the chicken at the thickest point to see if done. If overcooked, the chicken will feel hard without any give. If undercooked it will feel a little squishy. If cooked right it should have a little spring back.
If you are unsure if the chicken is cooked enough you can make a small cut into the thickest part of the chicken. If the center is still translucent then it needs more cook time. You could also use a meat thermometer and make sure the chicken reads 165 F.
**The chicken will continue cooking after it is taken off the grill. This is when most people overcook, because they remove the chicken too late from the grill. Once it has cooked completely through it will start drying very fast.
Grilled Corn with Basil Butter
Peel back the corn husks, but do not completely remove, and clean the threads off the kernels. Tuck the corn back up into its husk.

Grill the corn in its husk for about 4 minutes on each side. Remove from grill and take out of the husks. Shave the kernels off into a bowl. Add Basil Butter (recipe follows).
Basil Butter
Chop your basil leaves. In a food processor, or with a hand blender, combine the basil and butter. Pulse until smooth, adding a little EVOO if needed. I used a hand mixer so it helped for the mixture not to stick to the blades. I know this technically adds one more ingredient but I am sure you can let it slide.
Subscribe to:
Posts (Atom)


