Showing posts with label recipes. Show all posts

Wednesday, January 25, 2012

Crockpot-O-dile Rock

I have been constantly crock-potting the last month. Yes, “crock-potting”, it’s my new verb for continuous crock pot usage. I suppose I could substitute “slow cooking” but that just doesn’t sound a cool right? So, I blame my lack of writing to my constant crock-potting. The darn thing is addictive and causing me to only want to commit my loyalties to its remarkable power. I feel like I can plop my pantry contents into it and creates a masterpiece in 5 hours. And who can resist getting home from work and having a delicious meal already waiting for you? It’s my own little 50’s housewife. I step out of my car after a long day, the chilly air numbing my bones and am delighted with wafts of sumptuous smells emerging from under the door.


I felt if I filled the last 3 weeks of posts with just crock pot recipes you would call out my laziness and not my actual ingenious obsession. I may quite possibly still be in the denial stages of addiction so just go with my self flattery.

Taking this into consideration, and saving my dignity for now, I decided to theme it crockpot week and post my favorite meat and meat-less recipe so far. Yes, I realize it is Wednesday my day-conscious readers so I will run it through the middle of next week, posting at least 4 days of recipes. Days of yummy, thumb licking, I’ll never stress and cool at 6:00 at night if I can help it recipes.

Oh and get this…my picky little 7 year old…clearing his plate every night. Bless you crock potting, bless you. This post will be for my meat eaters out there. Enjoy!

Drip Beef Sandwiches
This recipe was passed down to my husband from our good friends the Darby's years ago and spurred his desires for it last Sunday when the weather just begged for a warm beef stew. I altered it with the amounts of seasoning. Note: this makes a TON!! We used the leftovers for three days, feeding my parents, the three of us, and still having leftover. I suggest making quesadillas with them one night!

Ingredients

5 pounds boneless chuck, trimmed slightly and cut into pieces
1 tbs kosher salt
1 tbs fresh ground pepper
2 tsp or cube of bullion
2 tbs rosemary
1 tbs basil
2 tbs garlic salt
4 tsp red wine vinegar
1 tbs Worchester sauce

You know that I always error on the high side of all ingredients so be liberal if you would like! It's a crock pot not a surgical procedure.
Directions

Place the chuck in the crock pot and add water until it covers the top. Top with all seasonings. Cook for 6 hours on high or until meat starts to shred. I served on gluten free baguettes. I recommend dipping the bread into the juice then stuffing the meat into it! My husband topped his with provolone but I think it stands good alone!

Wednesday, October 12, 2011

Kale Coma

Miss me? I am sorry I have been away. Between moving into my new house, getting cooking supplies unpacked, and well, a busted phone which holds the camera I have been relying on, I had a minor hiatus. No worries though because I am back in business and October happens to be my favorite month. Pumpkin shavings will adorn my side porch tomorrow as I chisel my spooky designs for my front porch Halloween décor. Butternut squash will be bursting with bold flavors in my oven. Apples happily sit piled in my fruit bowl and all the doors will be open letting the beautiful breeze brush my hair off my face as I feverishly cook for our weekend camping trip.


Back to the present day though. I arrived home today without one clue on what to make. Being that we attended a concert last night something warm and comforting was definitely on the menu. That and I have been in a tizzy to use anything that might expire while we are away. I despise wasting food. Maybe that is the reason I glutinously cleaned my plate today…Sure, I will go with that.

For produce I had to use up a large bushel of kale. My boiling pot is still MIA so brown rice would serve as a nice bed. And comfort? That comes in the form of a gooey, cheesy, sauce. I have made vegan cheese sauces in the past with great success but I really didn’t want to prep too much. With the basic ingredients in mind I threw together the one below and behold, a success was whirred up in my vitamix.


Cheesy Kale & Brown Rice

1 bushel of kale, stems cut off
2 cups brown rice
Cheese sauce (see below)
Vegetable broth
Pepper to taste

Easy Peezy Cheezy Sauce:

  • 2 tablespoons earth balance, melted
  • 2 tablespoons ground pepper
  • 3 tablespoons Dijon mustard
  • ½ cup nutritional yeast
  • ½ cup vegetable broth
  • 1/3 cup cashews, chopped
  • 1 teaspoon kosher salt
Instructions:
Prepare brown rice and set aside. I used boil in a bag brown rice because of my time crunch.
Prepare cheese sauce:

Add all ingredients in the vitamins and blend on high until smooth, scraping down the sides as needed. It will be very thick but no worries, it will thin when added to recipe.

In a medium saucepan add about half cup vegetable brown and warm. Add cheese sauce and stir. Keep adding a little vegetable broth until it becomes thinner in consistency. I like a thick creamy sauce so I didn’t add a lot but if you like thinner add more.

Add kale to the pan and coat with the sauce. Saute until tender, about 10 minutes. Add rice and combine. Serve with a dash of ground pepper on top! MMMMMM.


Enjoy!! Confession, I had two helpings. I blame it on my tiny Halloween plate!

Friday, July 22, 2011

The King's Peanut Butter Cookies

“I’ll sing you a story of a silly young king

Who played with the world at the end of a string,
But he only loved one single thing --
And that was just a peanut-butter sandwich.”
Shel Silverstein’s Peanut Butter Sandwich

Better bow down!
There is something quite childlike about peanut butter. I used to eat enough peanut butter sandwiches to rival Shel Silverstein’s king who ate his mouth shut. I could easily devour half a jar in a sitting, heaping creamy ribbons around soup spoons. I digress. Clearly I adored and adore to the stuff. So when I saw Elana from Elana’s Pantry post PB&J thumbprints I giggled in immature delight as the hunger butterflies fluttered in my tummy. I knew what sweet ending would sate my peanut butter fever.

That night after a delicious open faced veggie burger, yes those little patties are flying out of my freezer and flocking to my plate this week, I decided I had to change up our savory palates and pile on some peanut butter. I flipped Elana’s recipe out of my purse and begin to gather the ingredients. Alas, I did not have any decent jam or jelly though. I felt my heart sink into my stomach slightly. Pride and persistence made my eyes leap through the ingredients I did have and what I did have was plenty of peanut butter. No shame in a simple peanut butter cookie…

Maybe I was thwarted by the “chopped” episode in the background but I wanted to give myself an on the spot challenge. A peanut butter cookie that was 5 ingredients, vegan, gluten free, flourless, and could be enjoyed in 10 minutes (not including cooling). Mission. Accomplished.

These PB puppies were plump and decadent, melting into delicious morsels as soon as you popped it into you mouth. I had to show some serious restraint dear readers as I am sure you will too. I dedicate these cookies to the king, whose royal passion for peanut butter held me captive in its verses while I clutched my many childhood peanut butter sandwiches.

The King’s Peanut Butter Cookies

Ingredients
• 1 cup smooth (or crunchy if you wish) Peanut Butter
• ½ organic brown sugar
• 1 tbs organic vanilla
• 1 tsp baking soda
• Flax egg (1 tbs ground flax seed + 2.5 tbs warm water)

Instructions
Preheat your oven to 350F.Mix your flax egg in a small bowl and let sit for 10 minutes.

Combine all your ingredients in a large bowl and mix until thoroughly combined. Line a baking sheet with parchment paper. Form 12, 1 inch balls of dough and place them on the sheet. Do not flatten! Put that fork down and step away…I did sptinkle a teeny but of kosher salt on the top which yes I know technically makes it "6" ingredients but I am sure you can forgive me hehe.

Bake for 8-10 minutes until lightly golden brown and the cookies look “set”. Take them out and let cool for at least 10 minutes. The longer the better. They will continue to slightly cook on the sheet so do not worry if they don’t look done when you pull them out.

Plate and enjoy! I popped half in the freezer and enjoyed them last night. I highly suggest doing this if you have any left to save!
I made one dozen and saved the rest of the dough for future craving (tomorrow).

You can find Elana's Peanut Buttter and Jelly Recipe here: http://www.elanaspantry.com/

“A puff of dust, a screech, a squeak --
The king’s jaw opened with a creak.
And then in voice so faint and weak --
The first words that they heard him speak
Were, “How about a peanut-butter sandwich?”

Shel Silverstein’s Peanut Butter Sandwich

Tuesday, July 19, 2011

The Search for the GF, Vegan Burger Grail

Homemade veggie burgers can be tricky, especially when you want to make them gluten free and vegan. Why? Well, with my luck as of late they have either held together, looked pretty, and tasted like sandpaper, OR they have tasted amazing but didn’t exactly remain in a patty. Which is fine, but I am greedy and want both! As my quest for the vegan burger Holy Grail progressed, I was pleased to see that I wasn’t the only blogger pursuing this endeavor so I had a plethora of recipes to peruse the last couple weeks. I wanted constant consistency throughout the cooking, a delicious and fresh veggie taste, and of course a burger that was going to settle with my dietary guidelines.


The almost Holy Grail of Vegan/GF Burgers - I'm a perfectionist.
I think I found it. I still want to tweak a few things to the recipe but this is so far the best tasting trial I have had. Moist, nutritious, and held up when I flipped them! What more can a gluten free vegan chef ask for! Plus, it makes 8 patties so I have dinner ready for this week. Maybe I will come up with a second and third recipe for you! I am thinking sandwich wraps are in order.

Of all the recipes I found, Angela’s stuck out the most to me. I baked mine because I don’t have the gumption to grill them yet. In time my dears, in time. I had most of the ingredients in her recipe but had to make some substitutions. I also made mine gluten free, and topped them with spicy guacamole, dijon, fresh tomato, and local spinach leaves. Here is her original recipe here: Angela's Perfect Burger

I prepped on Sunday and let my burgers firm up on a cookie sheet overnight. I had every intention of gobbling these gorgeous burgers down Sunday, spent the whole time making them and ended up being hit with a mean pizza craving. Hey, what can a girl do?? It was worth the wait though.


Gluten Free & Vegan Pepita Burgers
(the closest thing to the burger grail so far)

Ingredients:
• 1/2 cup onion, diced
• 1 large garlic clove, minced
• Flax eggs: 2.5 tbsp ground flax + 1/2 cup warm water, mixed in bowl
• 1 cup oats, processed into flour
• 1/2 cup pepitas (Spanish pumpkin seeds)
• 1.5 cups gluten free bread crumbs (I processed 3 pieces sunflower flax bread)
• 1 cup local grated carrots
• 1 cup cooked black beans, rinsed and pureed
• Heaping 1/4 cup finely chopped parsley
• 1/3 cup almonds, chopped
• 1 tbsp. Extra Virgin Olive Oil
• 1 tbsp gluten free soy sauce
• 1.5 tsp chili powder
• 1 tsp. cumin
• 1 tsp. Italian seasoning
• Kosher salt and black pepper, to taste

For the 2 burger toppings:
• 2 gluten free hamburger buns
• 2 thick slices local tomato
• Spicy guacamole (I bought Whole Foods brand to save time)
• ½ cup local spinach
• 2 tbs dijon

Directions:
Preheat your oven to 350F and lightly grease a cookie sheet. In a large skillet, heat oil and add garlic. Once you can smell the garlic aroma add your onion and sauté until translucent and slightly browned. Mix your flax egg together in a small bowl and set aside for at least 10 minutes while you prepare the rest of the ingredients.

Prepare the rest of the ingredients as noted. I used my food processor and kept adding them into a large bowl, leaving the spices out to mix in last for taste testing. Once all ingredients are in the bowl mix well. The flax egg should help everything stick together. Add seasonings and salt to taste.

Roll out 8 balls to make sure all patties are equal size then shape dough into tightly packed patties, lightly wetting hands in between each patty to prevent sticking. I formed mine right onto the cookies sheet.

Bake for 15-17 minutes on each side. They should hold together for flipping but be gentle! Serve between those delicious buns holding all your scrumptious toppings.

I roasted local corn for our side! So easy to do in your oven. Just pop them in at 350F for 30 minutes, remove from oven and peel back husks. A little earth balance and pepper graced my little kernels!

Monday, June 27, 2011

Dairy Free Delight

My husband’s family loves brownies and cookies. I have been trying to focus and perfect my baking again, a love affair that seems to have jumped back from hiatus. You can knock me down but I’ll get back up! This sweet toothed inlaws, hubby/determined gluten free baker relationship has been working out well!


I saw an interesting brownie recipe on Elana’s Pantry the other day. Flourless Chocolate Chip Brownies. I have seen flourless cake and such and thought, hey, why not? I loved that the big ingredient was a whole jar of almond butter! Nothing processed, no artificial sugars, just a simple treat. Gluten Free and Dairy Free.

I made a couple changes to the recipe (shocker I know) but decided to keep the eggs for the first round since I have never attempted any recipe like this before. I plan on perfecting a vegan version soon. Here is Elana’s recipe: Elana's Pantry Chocolate Chip Brownies

Flourless Chocolate Chip Brownies

Ingredients

• 1 (16) ounce jar smooth almond butter
• 2 eggs
• 1 1/2 cups agave nectar
• 1 tablespoon organic vanilla extract
• ½ cup cocoa powder
• ½ teaspoon kosher salt
• 1 teaspoon baking soda
• 1 cup vegan dark chocolate chips

Directions:

Preheat your oven to 325F. Grease a 9x13 baking dish (I used Earth Balance).
In a large bowl, blend almond butter until smooth with a hand/immersion blender. Add eggs and blend well then slowly add in agave and vanilla. Add cocoa powder, salt and baking soda and blend until combined. Fold in chocolate chips. The batter was VERY THICK but hey, it’s an arm workout!

Pour batter into baking dish and spread evenly. I taste tested of course and found it to be very delicious! Bake for 35 minutes.

Remove and let cool for at least 15-20 minutes.

THOUGHTS:

My husband said that they were delicious but a little on the dry side and could maybe use frosting on top. My mother in law likes hers “more dry” and said they were very tasty.

I thought they were pretty good. Simple flavors but I do agree they could be a bit more moist. I will work on that! They rose well in the oven and were a perfect thickness. I think some vanilla vegan ice cream on top would make ALL the difference ;)

I will play around with the recipe more to accomplish a moist, vegan version. Any suggestions???

Tuesday, June 21, 2011

Something FISHY is going on here...

Something a little bit fishy happened yesterday. Fishy as in shrimp that is. Shrimp and Noodle Soup… Asian style. For the life of me I cannot figure out why this idea popped into my head but it just seemed right to make for dinner. Sometimes I like to look at other’s recipes and add/subtract this and that. Other times, like last night, I decided to create a meal from the scratch of my own thoughts. Fresh, simple, comforting, and a hint of unexpected heat. The more I thought about what I would put into the soup the more excited I got because I knew I had a lot of those items at home. I just needed to grab a couple specialty items from the ethnic section. Foreign. International. Whatever you want to call it, I would be grabbing whatever I thought would fit into my foreign soup from the shelves.

I headed to produce and grabbed a red bell pepper and organic shitake mushrooms (hooray on sale!). Some cooked shrimp, spicy sauce addition, and Asian veggies and I was set! I was really excited to see how this would all turn out.


My diet has been vegan/vegetarian for a while now, but with the exception of fish. We eat fish every once in a while because well frankly we still want it! The oils are good for my husband’s joints and like I said, our lifestyle is not about deprivation. We want to be healthy and happy. So the fishies are here to stay. However, feel free to omit the shrimp and you will have a lovely Asian vegan noodle soup!


My-Yum Shrimp & Noodle Soup

Ingredients
• 1 container vegetable broth (I used Pacific)
• ½ package gluten free Thai style noodles (I used Tinkanyada)
• 3 tbs Thai chili sauce
• 2-3 tbs gluten free soy sauce, low sodium
• Red pepper flakes to taste
• 1 can water chestnuts
• 1 can chopped baby corn
• 8-10 shitake mushrooms
• Canola oil
• 1 medium red bell pepper, chopped
• Pinch kosher salt

Directions
Bring vegetable broth to a boil in a large soup pot. Add in your noodles and cook for about 12-15 minutes. Reduce heat to low.

While your noodles nestle snugly in your pot, sauté your mushrooms and pepper in a medium sauce pan with a tablespoon of canola oil. When your mushrooms are soft, add chestnuts, baby corn, and red pepper flakes to taste. After a few minutes add your soy sauce and coat all your veggies. I let it simmer for a few minutes.

Add everything into your soup pot and stir to combine. Add chili sauce. Taste test. I added a pinch of salt. We had to run an errand so I let my soup sit on low, covered to let the flavors melt together.

The soup turned out DELICIOUS if I do say so myself. My husband and I gobbled down two bowls! Yum Yum.

NOTE: I used thai style noodles thinking that they would be thinner. They were delicious but as far as looks I think I will find a super skinny rice noodle for next time!

Monday, May 23, 2011

Rudi's OH-some Onion O's

My entry for Rudi's Gluten Free Cooking Contest:
Rudi's OH-some Onion O's
Gluten free, Baked, Kid and Adult Tested and Approved!

I am so excited to share with you my entry for Rudi’s Gluten Free contest. I have come up with a recipe that can be used as an appetizer, snack, or side. It can be dressed up for the party with its accompanying dipping sauce, or hang out beside you on a casual football Sunday. Whichever you choose, I can promise you that these little O’s are oh so delicious.

I wouldn’t necessarily call fried food a foe, but it is certainly not a friend of mine. For one, those oils can be contaminated and two they don’t often sit well in this Indie’s tummy. So, since I have been mastering the art of using cooking alternatives I have come up with a gluten free, healthier onion ring. Now, who can resist the leaning tower of crispy onion goodness glistening from my menu? Especially if you take out the frying and replace it with baking. A classic southern concoction that cuts calories and adds flavor is something I know that I personally cannot resist!

I experimented in the kitchen with many different ingredients and recipes. One of the challenges I ran into was deciding on which milk would bring the best flavor to the rings. I decided that since I feel better when I do not indulge in a lot of moo-cow dairy that I would use soy milk in my recipe, however please feel free to use whatever milk your little heart (or tummy!) desires.

These little O's were so delicious! I had to beat away my husband and inlaws so I could snap a picture for the contest before they gobbled them up. Yum to the last crumb!

Please go online to Facebook and vote for my recipe! The first round is based on facebook votes and I would love to have the chance to be considered by the panel of judges!


Rudi's OH-some Onion O's

Ingredients:
•2 slices Rudi's Orginal Gluten Free Bread
•2 Vidalia Onions
•1/2 cup rice flour
•Kosher Salt
•Black Pepper
•Cayenne
•Italian Seasoning
•1 tbs Canola Oil
•Olive Oil Spray
•Ground Chia or Flax seeds
•Soy Milk (or milk of choice)

Instructions
Preheat your oven to 450 degrees F.

Place 2 slices of day old Rudi's Gluten Free Bread in your food processor with 1/4 cup of rice flour. Add a pinch of salt, pepper, itlaian seasoning and cayenne. Pulse a few times then add oil. Process for about 30 seconds or until crumbly. Place your delicious homemade breadcrumbs in a shallow dish.

In a bowl combine 1/4 cup rice flour, chia egg (1 tbs ground chia and 3 tbs water), and 1/2 cup soy milk. Whisk until combined and formed into batter consistency.

Slice your onions into 1/2 inch circles and separate into rings. Wipe tears away from handling onions! Keep the larger rings and save the others for later. Place all your rings in a bowl and cover with milk, letting them soak while your oven finishes heating.

At the sound of the 'beep' dip your onion rings into the batter then the bread crumbs. Spray a cookie sheet with olive oil spray and place your little O's on the sheet. Spray the top of the rings as well so they crisp nicely.

Bake for 8 minutes then flip and bake for another 6-8 or until they are golden brown.
Serve warm and enjoy the compliments!

Monday, May 9, 2011

An American in Paris & Bruges

"France, and the whole of Europe have a great culture and an amazing history. Most important thing though is that people there know how to live!" Johnny Depp

Bonjour! I have returned from Europe and am bursting with new ideas, recipes to revamp, and well bursting at my hemlines as well! I was thrilled to see such interesting food culture and how they prepare and enjoy a meal. From grabbing a sandwich on the street to sitting down in luxurious, romantic settings boasting 4 hour meals, I was thoroughly exposed and inspired by the French and Flemish.

We first arrived in Belgium. Bruges to be exact. This quaint and colorful town was peppered with pretty buildings, glistening canals, specialty shops, and delicious fare from the sea. The cobblestone streets, preserved buildings, and lego structured rooftops left us feeling like we were on an ornate movie set, set back in time.We lived on a diet of mussels and frites with no complaints. That, and beer which was cheaper than water and a large part of the culture. The weather was perfect, the people friendly, and the food was incredible.Our last day in Belgium we rode our bikes up to Netherlands and created our own bicycle beer tour of the small town pubs on the way back. No worries gluten free vacationers, they have a gluten free brewery in Brussels!

Falling in love yet? That was just the beginning. We then took a train to Paris and spend a week emerged in the culture.

The good/bad for me thing about France is they LOVE THEIR BREAD. Love it. With everything. So, it wasn’t as easy for me to partake, however I did mentally collect how they used it in their meals and how I can twist it and make it gluten free.


View from our balcony
I was asked a couple times if I would be sticking to the vegan diet when I went to Belgium and France. I went more of the vegetarian route when I could. It was my first time oversees and there were a couple things I have always been dying to try. To be honest, it wasn’t as satisfying as I thought to eat dairy and what not again, but it was something I thought necessary to try. After 6 days of 12 course dinners every night this Indie is READY TO DETOX! I enjoyed tasting and diving into the diverse food culture but I am craving healthy salads and fruit. Not that they don’t have that over there by any means but I was an American in Paris if you know what I mean.

I digress. Staying up for 22 hours traveling and sitting here jetlagged with my words falling off the document may propose a comprehensive block for you dear readers. That said, I will leave you with one of my favorite blogger’s recipes. It’s big. It’s green. AND it’s loaded with nutrients. Sounds good after what I have put my body through the last ten days ;)


Classic Green Monster
from Oh She Glows

Ingredients
• 1 cup almond milk, or milk of choice
• 1 ripe banana, preferably peeled + frozen
• 2 handfuls organic spinach
• 1 tbsp chia seeds OR 1 tbsp ground flax
• 1 tbsp nut butter
• 1-3 Ice cubes

Directions
Starting with the liquid, add in 1 cup of milk of your choice. Now add in the chia or flax and nut butter. Next, add in the spinach followed by the banana on top. Blend until smooth. Add in your ice cubes and blend some more. Serves 1- about 2 cups.

Don’t freak out about the spinach. You cannot taste it I promise :) You can however taste kale. Feel free to add different fruits or spices! This recipe is easily adaptable.

Monday, April 18, 2011

Let’s Flake Out

"Just a spoon full of nutritional yeast can make the vitamins go down...I'll show you the most delightful way!"

I thought channeling Mary Poppins might help you read on and not shy away from what I am about to suggest you add to your food.Yellow in color and with a nutty cheesy flavor, nutritional yeast is an inactive yeast that is a favorite amongst many vegans because of its unique flavor and similarity to cheese when added to foods. A lot of people I know like to sprinkle it on hot popcorn, garlic bread, or create a “cheesy” pasta sauce.

Nutritional yeast is also a reliable food source of vitamin B12, so if you're vegan, it's a good idea to add some to your food regularly. They say to not add more than 3 tablespoons a day. Nutritional yeast can be found in the bulk foods or supplement section of your health food store. I bought the big jar of the whole foods brand. You can look for either nutritional yeast flakes or powder, but be sure you don't get brewer's yeast by mistake, as it's quite similar in appearance.

I am not going to lie to you dear readers, I was a little scared of the flakes and it wasn't because of the flake in the name. It was the yeast part. Yeast?? Oh a word that had such a negative connotation in my vocab. Why do I need to be eating yeast? I had all sorts of thoughts and worries about if it was something I needed to add to my diet. So I read. And researched. And read some more. And I figured, hey it couldn't hurt to try right? That's what this blog is about! I would like to share a little about what I found out.

Soooo…What IS it?

“Nutritional yeast is a tasty product you can find in natural foods markets. These yellow flakes are a pure strain of yeast called Saccharomyces cerevisiae. In the same family as edible mushrooms, yeast has been used in food and beverage production for more than 5,000 years. Today, the same strain is used to brew beer, make wine, and leaven breads as well as develop the nutritionally-rich food called nutritional yeast .

Each batch of nutritional yeast is grown on a mixture of cane and beet molasses for a period of seven days. B-vitamins are added during the process to provide the yeast with the nutrients it needs to grow. When harvested, the yeast is washed, pasteurized, and dried on roller drum dryers before it is ready for market. It is then used by food manufacturers in food products, added to boost the nutrient levels in pet foods, and simply packaged for sale in natural foods stores.

Vegans (strict vegetarians) have used it for years as a source of vitamin B-12, an essential nutrient found primarily in animal products. Health seekers who strive to eat primarily a whole foods diet use nutritional yeast because it tastes really good with certain foods and adds extra nutrients to their diet. It can be added when you cook quinoa in quinoa recipes, in salad dressings made with flax seed oil, or even sprinkled on top of free range chicken.

Unlike active baking yeast, nutritional yeast is grown solely for its nutritional value. It should not be confused with brewer’s yeast, a by-product of breweries and distilleries. nutritional yeast is a low-fat, low-sodium, kosher, non-GMO food that contains no added sugars or preservatives. The cane and beet molasses used in the growing process does not make nutritional yeast sweet and is not a source of simple sugars.”

Soooo...What do I DO with it?

Well, my husband jumped the gun and stirred it right into his soy milk. Just writing that makes my stomach turn. He won't touch the stuff now and quite frankly I don't blame him. I may not have if I had a bad first experience either. Patience is both a virtue and a food experience saver. I warned him to not dive head first into these flakes if you haven’t had them before. Men. Maybe I will sneak them in when he isn't looking a tell him after.

These are meant to be mixed in with food but I wouldn’t just dump it immediately into my drink. I added it to my sautéed veggie sandwich the other day and I LOVED it! It really does give a cheesy flavor and helps thicken your dish.

I have a macaroni and “cheese” recipe that I cannot wait to try out and share with you. Will these flakes flake out on their tasty goodness when starring in my dish? Stay tuned…

Wednesday, April 6, 2011

Overnight Oatmeal Bliss

I love oatmeal. It is so versatile. But I don't have a ton of time in the morning to fix it. Between working out, getting ready, getting my son ready, making his lunch, taking care of the dog, and getting my husband and son fed...Whew! You can see I don't have time to spend 15-20 minutes on my own breakfast. On my Friday's off I truly cherish this time and sit and prepare something scrumptious and time consuming.

So back to the oatmeal. I don't like mine runny so it takes a little bit to cook down the liquid needed to achieve my Indie consistency perfection. I had seen "Vegan Overnight Oats" on the Oh She Glows blog and have been contemplating throwing these together to try. I have been good about stocking my pantry with bulk ingredients so luckily I had everything to make them last night! Cold oats? Hmmm. I did make YOU wait overnight for a recipe though so I figured making myself wait overnight to try these oats was only fair. Yes, yes the things I do for you dear readers ;)

I wanted to start with the basic oats and if I liked them, then you and I can have some fun adventures! My husband said that he wanted to try them too so I doubled the recipe. I was hoping that it wouldn't mess it up. Hoping and praying because I relied on this meal for my morning fuel! It doesn't require many ingredients and took only 5 minutes to make!

I pulled the bowl out of the fridge this morning and was very satisfied that I at least already had breakfast prepared! I divided the portions between two bowls and still had some leftover. Yipee!

I forgot to snap a picture this morning but it looked like hers!
Taste test. Oh. My. Gosh. Obsessed. I was leary of eating cold oats but these were AMAZING! Truly! Creamy and the perfect consistency. We both added a tablespoon of almond butter to ours. Maple syrup was also suggested but we didn't have any organic real syrup so we skipped it. It wasn't missed.

Here is the original recipe. Like I said, I just doubled everything but then ended up with extras (not complaining!). I can't wait to add fruit and nuts to these in the future! Besides a bowl of cereal, this is probably the least laborsome and delicious breakfast I have made. Here is the link to the original recipe and comments from Oh She Glows Easy Vegan Overnight Oats

Vegan Overnight Oats

Ingredients for PM
  • 1/3 cup regular oats
  • 3/4 cup almond milk
  • 2 tablespoons chia seeds
  • 1 small ripe banana, peeled and smashed
  • 1/4 teaspoon pure vanilla extract

Directions
Mix together all the above ingredients in a bowl and place in the fridge overnight.

AM Directions
Scoop out your desired portion into the bowl. We added one tablespoon of natural almond butter. Enjoy!

Tuesday, March 29, 2011

Grey Days, Souper Comfort

Springtime storms are officially here. It is another gray and rainy morning here in Tulsa. I keep reminding myself that the heavy clouds are pouring colors into our dreary surroundings. I am happy to see the lavender buds on the trees, and the pops of white petals drifting in the warm breezes. This morning I have yet to fully awake as I write but alas I do have to be at work early this week so I have no choice but to wipe the sleep from my eyes and begin. So bear with these stiff fingers and clouded mind as I share with you a delicious vegan soup!

Ah soup. Such a perfect comfort food. I have been on many soup binges in my life I must admit. Hey, don’t judge, we can’t help what we crave sometimes. It could be a hundred degrees, humid, and sweltering, and my soup fix could get me itchin’. Maybe because it is such a versatile little bowl of nutrients. Or the fact that it seems to warm my tummy and easy my troubles simultaneously.

Regardless of why I crave it, it’s important that I pay attention to what kind of soup I am eating these days. And not just because of the lurking gluten monster disguising itself in the ingredients. Canned soups can pack a ton of extra sodium that makes my joints cry out with swollen sobs. Plus, who wants UFI’s (unidentified floating ingredients) in their bowl? Well, not me. But hey, if you’re comfortable teetering that Area 51 line go right ahead! It’s not to say that I haven’t divulged in a cup of Ramen in my day. Now I just am aware of how puffy I plump with the additives so I think I personally will steer clear. Maybe it was also a sign when I managed to catch my ramen noodles on fire in the sorority house microwave. No water = flames. See, we all have to grow our “natural” cooking skills from somewhere.

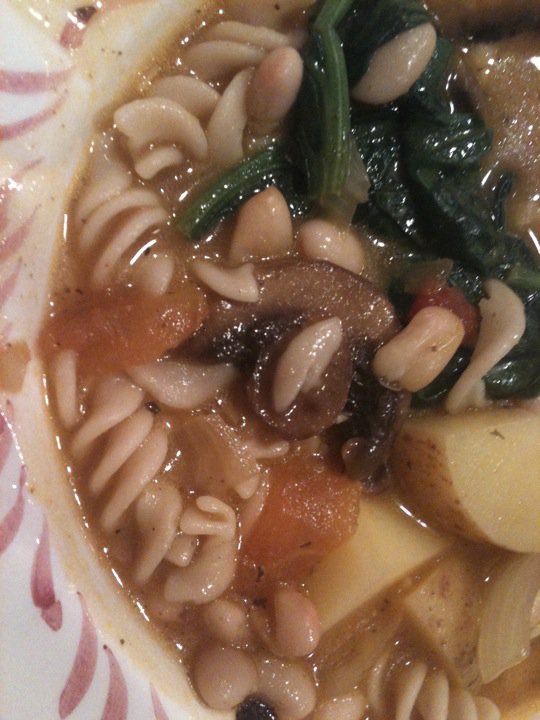
My remedy to the soup equation I have rolling here would be to make your OWN soup! That is much more satisfying anyway right? I looked at a ton of soup recipes over the weekend and managed to settle on my one to share. My past soups were good, but I wanted to try something new for you. A couple blogs mentioned this stew, and after a couple of my own little tweaks I think it was PERFECT! I am thrilled also because it makes a lot so I have a comfort food dinner to last me through the next gray days.

Here is the original recipe below, and you can find my changes in the notes. I had to take in account some g-free factors of course in my recipe and directions. Both I am sure are delicious and nutritious.


Kathy's Veggie (vegan) Pasta Stew

  • 4 ounces sliced mushrooms
  • 1 medium tomato
  • 1 large sweet onion
  • 1/4 cup extra virgin olive oil
  • 1/2 tsp pepper
  • 
    I think a better camera is in order...
    
  • 1 tsp garlic powder or 2 Tbsp chopped fresh garlic
  • 2 bay leaves
  • 4 cups vegetable broth
  • 
  • 1 cup water
  • 2 Tbsp Italian Herbs
  • 1 potato, diced
  • 1/3 cup nutritional yeast or 1/4 cup vegan cheese
  • 1 cup dry fusilli pasta
  • 1/3 cup leftover roasted tomato salsa
  • 2 Tbsp apple cider vinegar
  • 1/4 tsp salt (or to taste)
  • 1 can of beans, drained (I used white cannellini beans)
  • 6 ounces leafy greens (spinach, kale, chard, collard..)
optional: a few dashes of cayenne for added heat.


Directions:

1. In a large soup pot, add the onions, tomato, mushrooms, garlic and olive oil. Stir and saute for about 5 minutes, until the onions become translucent.

2. Add in all the remaining ingredients (except the beans and leafy greens). Bring to a boil, then reduce to a simmer and cover with lid. Allow to simmer for 20 minutes. Do a few taste tests midway through and check on the salt/spice levels.

3. When you are just about ready to serve the soup, you can add in the beans and greens. Adding the last keeps them tender and not mushy. If you want your greens a bit more hearty, use kale or collard. Spinach wilts very easily.

4. Serve warm! With a nice slice of crusty bread.


My changes to the Recipe:

  • 4 ounces sliced mushrooms – I used a blend pack of portobella, cremini and shitake
  • 2 small/medium vine tomatoes
  • 1 large sweet onion
  • 1/4 cup extra virgin olive oil
  • 1 tbs pepper
  • 2 cloves of garlic, minced
  • 2 bay leaves
  • 4 cups organic, low sodium vegetable broth
  • 1 cup water
  • 2 Tbsp Fine Herbs
  • 3 Yukon gold potatoes, chopped
  • ¼ cup vegan cheddar
  • 1 cup dry gluten free fusilli pasta
  • 1 tbs kosher salt (or to taste)
  • 1 can of beans, drained (I used white cannellini beans)
  • 6 ounces leafy greens – I used a large bunch of fresh spinach since it cooks down
I added a tbs or so of Cajun seasoning to bring out the flavor and spice.

Directions:

1. In a large soup pot, add the onions, tomato, mushrooms, garlic and olive oil. Stir and saute for about 10 minutes, until the onions become translucent.

2. Add in all the remaining ingredients (except the beans, pasta and leafy greens). Bring to a boil, then reduce to a simmer and cover with lid. I transferred to my crock pot and let it simmer on low for 40 minutes. Do a few taste tests midway through and check on the salt/spice levels.

3. While your soup is simmering, cook you gluten free pasta to al dente. With the potatoes begin to soften, about 30 minutes, add in your pasta to the pot.

4. When you are just about ready to serve the soup, you can add in the beans and greens. Adding the last keeps them tender and not mushy. If you want your greens a bit more hearty, use kale or collard. Spinach wilts very easily.

5. Serve warm! I toasted Food for Life’s gluten free rice bread in the oven with a drizzle of olive oil and a dash of Cajun spice to accompany the soup.

Wednesday, March 23, 2011

Burger. What's in a Name?

What's in a name? That which we call a burger by any other name would smell as savory…


Burgers. We all love ‘em. And that is exactly what was on the menu last night! But like dear Juliet portrayed in her soliloquy, this burger is far more than its mere given title. This is not your meat packed patty that pops in your noggin when you hear ‘burger’. No, this burger is better is better than that. Yes, I am calling you out. My burger is better than your burger.

Nanner Nanner Boo Boo.

This burger is packed with protein, and oh was it delicious! I saw the recipe on “Oh She Glows” and knew that my first homemade veggie burger would be this one. A couple gluten free adaptions and we were ready to go! Obviously these can me made with non gluten free ingredients as well. So let’s bust out the food processor and start patty cakin’ those veggie patties together. Oh and if your grill has not shed its winter cover, no worries! These are baked to goodness in your oven!

Vegan & Gluten Free Lentil-Walnut Burgers

Ingredients:
• 3/4 cup lentils, picked over and rinsed
• 3/4 cup walnuts, toasted
• 1 piece gluten free bread, toasted OR 1/3 cup GF breadcrumbs
• 1 tsp ground cumin
• 2 tsp ground coriander
• 1/4 tsp red pepper flakes
• 3 cloves garlic
• 1/4 tsp sea salt
• Freshly ground pepper
• 1 tbsp extra virgin olive oil
• 1 chia/flax egg (1 tbsp ground chia or flax + 1/4 cup water)

Directions

Preheat oven to 350F. In a small bowl make the chia or flax egg and set aside. Place lentils in a small pot and add a couple cups of water. Bring to a boil and simmer for about 25 minutes. Remove and rinse in colander.
While the lentils are cooking, toast the walnuts by placing the walnuts on a baking sheet and cooking at 350F for about 12 minutes until golden brown and delicious. Let cool.

In a food processor, process the garlic, walnuts, toasted bread OR breadcrumbs, garlic, spices & seasonings until combined. Now add oil and lentils and pulse until coarsely chopped (some lentils should be visible and left chunky). Add the flax or chia egg and pulse a bit more until combined.

Now shape 4 patties with hands and place on a baking sheet lined with parchment or a non-stick mat. Bake at 350F for 20-22 minutes on each side for a total of 40-45 mins. bake time. Makes 4 patties. Adapted from Martha’s Great Food Fast Cookbook from the Blog Oh She Glows.

We topped ours with fresh spinach and ripe tomato. The tomato is a must! I was planning on adding guacamole but they had over ripened. But no worries, we have 2 left for tonight and I am headed to the store at lunch to pick up some avocados!

Our burgers didn’t need the whole 22 minutes once they were flipped. I was being careful that didn’t turn out too dry either. Make sure that you make your patties even. If the ends are thinner they are likely to dry out an burn. Nobody wants a burned burger.

I have yet to find a Vegan & Gluten Free Bread or Hamburger Buns so unfortunately I strayed from my vegan diet last night. One step at a time. I have cut out milk and cheese. Eggs were baked in this bread but I have been cutting them out otherwise. If you know of any gluten free/vegan breads let me know!

I cannot wait to experiment with different recipes after making this one. Of course I will be changing it up and posting new ones for you!

Tuesday, March 15, 2011

No-Nonsense, Tough Love

Sorry if I have been on a bit of hiatus from the blogging. I have been engulfed in a new read that many of you readers have encouraged me to pick up. I read all the time and it doesn't usually grip me in this way, but I wanted to dive in as much as possible before sharing my thoughts.What words have me so enthralled that I have diverted from writing? Skinny Bitch. Now, before you think I should go wash my mouth out with soap, or in my childhood experience vinegar (thanks mum for going easy on me…confession I kind of liked the taste), I want to give you an explanation of this in-your-face “no nonsense tough-love guide”.


Well, let me back up a tad. Remember when I said that my New Years Resolution was to incorporate more veggies into the menu? I know you’ve slept since then and probably can’t recall but that is what I said. In pursuing my goal, it turns out I stopped eating meat all together! Kind of accidentally I suppose. I didn’t have it as my main star of the plate and I was so focused on my goal that I disregarded the ol’ animal flesh all together. I realized this about a month into it. The crazy thing was I didn’t want it anymore. I didn’t crave it. I found things that taste better than meat.

I had tried going vegetarian for a 30 day challenge with my husband before and I am not going to lie, it was an epic fail. I was yo-yoing with my energy levels and I felt deprived. There, that word, DEPRIVED. This time there was no deprivation. If I wanted it, I would eat it. But I haven’t yet. It’s been 2 ½ months now and I haven’t. Milk seems to be seeping away from my diet as well, being replaced by almond milk and soy milk. They taste better and I feel better after I eat/drink it.

The results so far? My energy levels are skyrocketing, my body feels incredible, and I have never run like this in my life! It was all a choice. It’s interesting that since I started eating this way, other things are becoming less appetizing to me as well. Eggs and milk primarily. Cheese and fish are still going strong. Well, cheese maybe not so much as of this week. Weird I know.

Okay, back to the book. Skinny Bitch. Read it. It truly is amazing. And no I am not trying to brainwash you or anything. Maybe just trying to help de-brainwash you. I don’t believe in converting the world into my opinions. But I do believe in educating yourself and knowing what you are putting into your body. Not preaching, just sayin’.

I bought the set of Skinny Bitch & Skinny Bastard for my husband and I to read. Skinny Bastard is the same information that is tailored to the male. C’mon, we don’t always think the same as the opposite sex and you know it. Every night we have been reading and discussing. It’s quite fun!

I digress, and as you well know my blog is essentially about FOOD. So get ready for some new recipes to come! Vegetarian or not, those good little numbers won’t hurt you to incorporate into the diet. I promise. I am still here after all, and in no pain I assure you.

Monday, February 7, 2011

Cabin Fever Sandwich

A sandwich used to be an easy meal to whip up in the kitchen. A couple slices of bread, turkey, a bit of cheese, lettuce, spicy mustard…You get the picture.


Now picture this- waiting for your loaf of bread to thaw so you can break 2 slices off, then toasting to warm the bits of ice off and completely thawing, then adding everything between the slices. A panini takes longer, a simple grilled cheese can be botched easily, and the whole time you hold your breath that the piece of bread doesn’t fall apart.

This has been my journey through bread. I have taste tested and experimented a lot in the kitchen with this simple yet fickle food and finally settled on a few different bread brands that work with me and not against me. Rudi’s and Udi’s both have served me well on many occasions. San Juan 5 grain has done me right too. I don’t HAVE to freeze them either! I do because I don’t eat bread too often and I don’t want to waste, but I can pull a couple slices fresh out of the bag now if I wanted to. It’s wonderful I tell you. And these breads don't require a gym workout to be able to break apart the slices when and if you decide to freeze them.

Sounds silly to admire something so simple sometimes, but when you’re gluten free it’s the little blessings you begin to count. I have developed a great appreciation for food and what I put into my body. I’m a laborious label checker, to avoid gluten and over processed foods and I aim to eat calories that will benefit me and my life.

That said, I promised some recipes using Rudi’s gluten free multigrain bread. Last week I was snowed in so I was able to whip up some delicious meals. It was very hard to choose just one, but I did. Sorry, leaving you wanting more I know. I will post more though, don't you worry your sweet little heads my dear readers.

This sandwich truly is a bit of an “everything but the kitchen sink recipe”. Or more relative to my actual situation, “what I could rustle up in my almost barren pantry from being snowed in recipe.” As I perused my potential pantry contenders I began formulating a delicious, warm, hearty, and open faced lunch. Here you go!

Baby Bella, Spinach, & Toasted Pine Nut Open Faced Sandwich

(Told you it was a doozy!)

• 1 cup Baby Portobello mushrooms, sliced

• 1 clove garlic, minced

• 2 cups raw organic spinach

• 2 tbs EVOO

• 1 tbs Balsamic Vinegar

• ¼ cup toasted pine nuts

• Pinch of Oregano

• Pinch of Rosemary

• Salt and pepper to taste

• Freshly grated parmesan

• ¼ -½ cup Marinara


Directions:

Toast your 2 slices of bread and set aside.

Place your pine nuts on a small cookie sheet, and toast in the oven for about 5-10 minutes at 350 degrees or until lightly golden brown. Remove and set aside.

In a small sauce pan heat the olive oil on medium heat. Add garlic and stir until fragrant. Toss in your mushrooms, coat, and sauté until soft (5-7 minutes). Add you balsamic vinegar and mix to coat then toss in your spices.

Add in your spinach a handful at a time (your pan will be crowded but it will cook down quick). Keep adding until all your spinach is mixed in and cooked down. Remove from heat.

Spread your marinara evenly on your bread. I had leftover Classico Marinara from the pasta I cooked up the night before so whatever you have or tickles your taste buds. Top with freshly grated parmesan that will melt when the warm veggies hit!

Put your delicious spinach and mushroom mixture on top, and sprinkle your pine nuts over the sandwich.

ENJOY!

Friday, February 4, 2011

He's A Magic Man

Savannah enjoyed the snow days!
The great blizzard of 2011 hit Tulsa Oklahoma this week. If you aren’t from Tulsa, you should know that we usually shut down with a couple inches of snow. Almost 15? We are in crisis mode. We were in a state of emergency before you could muster out the word snowpocalypse.


My husband and I took heed to the warnings and prepped accordingly. Our pantry was stuffed to the brim, our refrigerator stocked with all the necessities, and our freezer was exploding with frozen veggies and gluten free breads. Looking at it all, I felt like we were prepared to not leave our house for about a month, but when the ravenous cabin fever hit us all at the third day I can assure you we made quite a dent in our stash. Yes, those mounds of silvery candy wrappers in the bin are mine. Don’t judge.

The plus side of the storm was that we set a delicious menu for the entire week together, picking warm, hearty, and time consuming dinners. It was so enjoyable smelling the 15 bean soup simmering on the stove, corn muffins basking in the oven light achieving the perfect lightly golden tan…rocking to jazz with a full bodied glass of cabernet sauvignon. Ah, this blizzard was bliss.

But it’s not the 15 bean soup that I am sharing with you today. It’s something my husband cooked up. One of my FAVORITE things he cooks up. Mushroom Risotto. Creamy Arborio rice oozing with freshly grated parmesan cheese and folded into plump cremini mushrooms. Decadent. Delicious. And, I am drooling on my keyboard.

I have prepared this dish before, but there is just some hint of little magic in my husband’s hands that make it that much more delicious. So, cheers to him! And cheers to me for having the sense to marry the ol' cook!

Mushroom Risotto

• 6 cups organic chicken broth

• 2 tbs EVOO

• 1 lb cremini mushrooms

• 1 ½ cups Arborio rice

• ½ cup white wine (we used sauvignon blanc)

• Salt & pepper to taste

• 1/3 cup freshly grated parmesan

In one pot warm broth over low heat. In another pot heat the olive oil and add your mushrooms and coat. Sautee until they are soft.

Remove the mushrooms and set aside. Add your rice to that pot. Pour in your white wine and let the rice absorb all the liquid. Add ½ cup chicken broth and stir until absorbed. Continue to add ½ cup chicken broth at a time and stir continuously until the rice is al dente, about 15-20 minutes.

Remove from heat and add your mushrooms and parmesan. Add salt and pepper to taste.
Plate and enjoy!!

Wednesday, December 29, 2010

Let's Start a Roasting Revolution

I have been hearing a lot of talk of New Year’s resolutions and it’s gotten me thinking about all my past resolutions. Some worked, some didn’t. Some I whole heartedly tried to follow through with and others I figured

if I said it out loud that would make enough of a difference. We all want to drop those pounds, and eat healthier, and take up YOGA and Japanese and whatever outlandish opportunity we feel we need to embark on. It’s not that I am being pessimistic people. I think it GREAT to think BIG. But what we end up missing is the BIG picture. What are you going to do to stay on track? What is going to motivate you? Who is going to make sure you stick to it?

We want to make all these BIG changes. But what we really need to do is look at the little things we can do to make a BIG change. Let’s face it. I am probably not going to be fluent in Greek by next January (sorry yiayia) but it wouldn’t hurt to learn some useful conversation that doesn’t involve cursing. See, baby steps.

So with all that mumbo jumbo from the heart and off the subject of food, which is I hope why you are really here and taking the time to read my blog, I will get to my point. My new year’s resolution is to be as happy and healthy as I can be, and my baby steps will be through my cooking dear readers. As I am writing this I can see the words of my last few blogs about cookies and Christmas time just drenched in sugars and sinful seduction. We all have to indulge every once in a while though. I think I will make that part of my “happy life” resolution. No worries, the cookies will keep coming.

Onto the healthy food part of my resolution, I am going to start cooking more with vegetables, and have them be the main star of the show on my plate. I’m going green in my kitchen! I love meats so therefore they tend to rule the menu, but after much research on healthy eating and a healthy diet, I have decided that little drumstick needs to be downsized. Snacking on healthy foods between meals is a must as well and I am on a hunt for a plethora of choices that are easy to grab and go, whether it’s breakfast, lunch, dinner or a snack.

Today the lunch item/snack is roasted edamame. I picked my lunch up from whole foods the last couple days and sampled some of their vegan options to get some ideas.

I ran across these green little health monsters and boy did they WOW me! I had to go find that recipe. Unfortunately the exact one was not on their website, but I found one that is quite close. Add some roasted red peppers and green olives to this recipe and you have a match made in heaven.

Roasted Edamame

•2 teaspoons olive oil or 2 teaspoons vegetable oil
•1/4 teaspoon dried basil, crushed
•1/2 teaspoon chili powder
•1/4 teaspoon onion salt
•1/4 teaspoon ground cumin
•1/8 teaspoon paprika
•1/8 teaspoon black pepper
•1 (10 ounce) package ready-to-eat soybeans, thawed if using the frozen variety (fresh or frozen, edamame)

Preheat oven to 375°F. In small bowl, stir together oil, basil, chili powder, onion salt, cumin, paprika and black pepper. Drizzle mixture over soybeans and toss to coat well. Arrange beans in a single layer in a shallow baking dish. Roast, uncovered, for 12 to 15 minutes, stirring once, until soybeans begin to brown.
Serve hot as a vegetable side dish or cooled as a snack.

Monday, December 27, 2010

A Very Cherry Christmas

My husband has been craving all things cherry the last few weeks. Cherry shakes, cherry cobbler, cherry this and cherry that. So of course when the

local newspaper featured a huge story on the 12 days of Christmas cookies, my husband zoned in on, you guessed it, the cherry icebox cookies. Shocking I know.

Now those of you who have followed my blog know that gluten free baking and I have had our showdowns in the past and that I have been sticking to cookie dough that steers clear of substitutions that potentially forecast a doughy flood in my oven. I make non gluten free goods for him all the time, but I was feeling rather brave yesterday. Maybe it was because I had my son home with me and he is always willing to fearlessly dive into whatever project I come up with that day. I decided that I needed to woman up and take whatever consequences this adventure threw at us. Plus my son would no doubt get a kick out of the mess that was likely to ensue on my counters and in my oven. What we mothers do to bring a smile to our little one’s faces.

After returning from the store with our ingredients and new found spunk towards the wintery afternoon’s culinary exploration, we tied our apron strings, laid out our tools on the counter, and began a sweet discovery into cherry bliss. Which of course started with breaking into the cherry jar and popping two or three in our mouth at a time. Hey, we needed all the energy we could get!

After the prep work had been finished , our aprons and faces sprinkled with sweet rice flour, and the dough nestled into saran wrapped cocoons in the refrigerator to cool, we kicked up our feet and admired the first round feat.

A couple outdoor games, art projects, and one Polar Express movie later, the cookie dough had cooled and the two us got our hands dowsed in dough once more as we sliced and situated our cookies on the pan. 9 minutes later a taste test.

Perfection.

Sweet Perfection that melted in our mouths. Oh, these cookies will for sure make Santa’s cheeks a little pinker and the twinkle in his eye a little brighter this year. This recipe makes enough cookies to satisfy Santa, the reindeer, and most the elves so expect to be sharing! Tis the season for that anyways though right? They would make darling presents for coworkers or friends. Just jazz them up in fun holiday trimmings and make everyone’s spirits bright!

Cherry Icebox Cookies

•1 cup butter, softened
•1 cup sugar
•1/4 cup organic packed brown sugar
•1 large organic egg
•4-1/2 teaspoons lemon juice
•1 teaspoon Pure Vanilla Extract
•3-1/4 cups sweet rice flour
•1/2 teaspoon baking soda
•1/2 teaspoon ground cinnamon
•1/2 cup chopped walnuts
•1/2 cup chopped maraschino cherries
•1/3 cup maraschino cherry juice


In your mixing bowl cream your softened butter and both sugars until light and fluffy. Then beat in the egg, cherry and lemon juices. Slowly add your vanilla. Pour all dry ingredients in a separate mixing bowl and whisk until thoroughly combined. Then gradually add to the creamed mixture and mix on medium until well combined. Remove from your mixed and carefully stir in walnuts and cherries.

Divide the dough into 4 even parts and roll into a cylinder shape. The dough might be pretty thick. Wrap each in plastic wrap and refrigerate for about 3-4 hours or until firm.

Remove dough just before baking. Heat oven to 375 degrees. Unwrap a roll and cut into quarter inch slices. Place 2 in. apart on ungreased baking sheets. Bake at 375 for 8-10 minutes or until the edges begin to brown. Remove to wire racks to cool.

This recipe makes about 6 dozen cookies depending on how much dough actually makes it to the oven!

Monday, December 20, 2010

Easy G~Free Cookie Recipe

With Christmas caroling its way into our daily agendas, I am constantly surrounded by all sorts of treats. Christmas cards, Christmas candy, Christmas cookies…and therefore Christmas LBs.

But hey, it’s an excuse to indulge right? As long as I can hide out in my Christmas sweaters I will be a jolly ol’ Indie.

Christmas parties have been in full swing, and potlucks have popped up all over my calendar. So the question arises, “What goodie will I bring to this fete that I can eat, and I won’t subject my friends to unfamiliar grounds?” I always made sure that I brought something equally as healthy as it was pleasing. Now I have to add in the factor of of being able to devour my own dish as well. Appetizers, main dishes, sides are no sweat.

It’s the dessert my friends. The perfect ending to a meal.

The easy, go-to dessert to be exact. And what USED to be my favorite things to make? Cakes, cookies, and cupcakes. Even if I bought a boxed start to my desserts, I jazzed it up with added ingredients or my own toppings. But my dear friends, the easy grab a box off the shelf days seem to be over. At least I have not really had success with the pre mixed concoctions that I have purchased. In the four I have tried (I will leave names out as I do appreciate the company's consideration)they don’t bake right, taste grainy, or have a mudslide consistency. Maybe I am just not used to the stuff, but I don’t have the time or money this season to try every gluten free box of potential potluck pound cake.

I could make a homemade dessert that I am sure will turn out lovely, but when you are on the clock you don’t have time to spend collecting 20 different little ingredients that you will pay five bucks a piece for, need one tsp, then not need to use the ingredients for another couple weeks. By then, you are worried that the baking agents won’t hold up as well. Or maybe I am just paranoid about it's shelf life and what little I honestly know about it right now. In my own defense I took a big hit on the dessert front when I was diagnosed and havoc ensued. But that is here nor there, and I still need a dessert with less than 20 ingredients.

Much research again brought me to another “Duh, why didn’t I think of that” moment.

I have made sugar cookies and peanut butter cookies PLENTY of times in the past, and some don’t require any flour at all! Duh, Duh, Duh Mrs. Indie. I am a natural blonde, if you couldn’t tell.

Anyhoo, with those two cookie bases, my options are once again endless. An egg, sugar, vanilla extract, and some peanut butter, and I am back in the game my dears! I can top my cookie concoctions with peppermints, chocolate, nuts, fruit,assorted candies, sprinkles, frosting… I digress. My sweet tooth began to buzz.

Below is a go to peanut butter cookie recipe with holiday topper ideas

that will bring you holiday cheer, and have you smiling from ear to ear. Oh dear, Christmas has this blogger rhyming too much now I fear.

Gluten Free Peanut Butter Cookies
•1 large free range organic egg
•1 cup sugar
•1 cup organic peanut butter
•1 tsp kosher salt
•1 tsp vanilla extract (optional but I like what it brings to my baking)

Preheat you oven to 350.

Mix all ingredients together in a bowl. Roll into balls and place them on a greased baking sheet. Press a fork dipped in sugar in criss-cross pattern (your cookies will be slightly flatter).

OR take advantage of cookie cutters! Instead of rolling your dough into balls, flatten out your mix on a sheet and press away with holiday designs!

Bake at 350 for 8-10 minutes.

If you plan on topping with candy:
Let cookies cool on a wire rack until they are just a little warm. You don’t want to melt your topping, but you also want it to press far enough into the cookie to stick.
Press your candy into the cookie and serve!

If you plan on icing or sprinkles:
Let cookie cool completely before adding your iced decorations. I like to buy vanilla icing and add green or red food coloring. To make your own icing piper:I mix my frosting and food coloring in a bowl, then spoon it into a ziploc bag with a spatula. Press the frosting into one tip, and then snip a little off the corner depending how thick you would like your piping. This allows you to have more fun with your icing details and look like a pro!

CHRISTMAS COOKIE TOPPERS (because I am ALWAYS in theme right?)
•Mini candy canes (whole or crushed)
•Hershey kisses
•Peanut butter cups
•Apple slices with cinnamon
•Red and/or green icing
•Red and/or green sprinkles
•Dried cranberries
•Red/Green holiday m&m’s (peanut or plain)
•Almonds
•Walnuts (go crazy and candy them!)
•Shredded coconut (snowy pb cookies)