Showing posts with label entertaining. Show all posts

Friday, September 30, 2011

Staples


Today I am here to talk about staples (the ones in your pantry not in your office) because you never know when a gluten free gal pal will drop by for an unexpected happy hour, or when that long day of work leads you to a glass of wine or two. I always try and be prepared to entertain last second, so today I share with you a few staples that I keep in my pantry and fridge. You can impress in pressing time with the following:


Cheese
  Sharp Cheddar
  Gouda
  Marble Jack
  Pepperjack

Hummus with Raw Veggies
   I like making my own hummus but store bought tastes great too!
  Carrots, celery, or brown rice tortillas to dip
  Pretzels (try Glutino’s)

Chips and Salsa
  Corn chips (read labels!)
  Any brand of salsa or make your own

Fruit (all fruit is GF but these I think look great on a plate for happy hour!)
  Grapes
  Apples
  Raspberries (place chocolate chips in their center for an elegant and tasty version!)

Chocolate
  Dark chocolate or milk chocolate squares are great!

Gluten Free Crackers
  Marys Gone Crackers
  Nut Thins (I love the hint of sea salt flavor!)

Throw any of these together on a plate and you are good to go!

Some great gluten free brands:

o Udi’s
o Rudi’s
o Glutino
o Marys Gone Crackers
o Nut Thins
o Tinkanyada
o Enjoy Life
o Gluten Free Pantry
o Erewhon

My Current Favorite Gluten Free Beers:

o Redbridge
o Greens
o Bards

Wine is gluten free. Check out these vegan wines:

o Charles Shaw
o Frey Vineyards
o Four Chimneys Organic wines
o Hip Chicks Do Wine
o Mountain Cove
o Orleans Hill Winery
o Red Truck
o Yellowtail

Happy Friday to you readers! Enjoy your weekend!

Tuesday, July 19, 2011

The Search for the GF, Vegan Burger Grail

Homemade veggie burgers can be tricky, especially when you want to make them gluten free and vegan. Why? Well, with my luck as of late they have either held together, looked pretty, and tasted like sandpaper, OR they have tasted amazing but didn’t exactly remain in a patty. Which is fine, but I am greedy and want both! As my quest for the vegan burger Holy Grail progressed, I was pleased to see that I wasn’t the only blogger pursuing this endeavor so I had a plethora of recipes to peruse the last couple weeks. I wanted constant consistency throughout the cooking, a delicious and fresh veggie taste, and of course a burger that was going to settle with my dietary guidelines.


The almost Holy Grail of Vegan/GF Burgers - I'm a perfectionist.
I think I found it. I still want to tweak a few things to the recipe but this is so far the best tasting trial I have had. Moist, nutritious, and held up when I flipped them! What more can a gluten free vegan chef ask for! Plus, it makes 8 patties so I have dinner ready for this week. Maybe I will come up with a second and third recipe for you! I am thinking sandwich wraps are in order.

Of all the recipes I found, Angela’s stuck out the most to me. I baked mine because I don’t have the gumption to grill them yet. In time my dears, in time. I had most of the ingredients in her recipe but had to make some substitutions. I also made mine gluten free, and topped them with spicy guacamole, dijon, fresh tomato, and local spinach leaves. Here is her original recipe here: Angela's Perfect Burger

I prepped on Sunday and let my burgers firm up on a cookie sheet overnight. I had every intention of gobbling these gorgeous burgers down Sunday, spent the whole time making them and ended up being hit with a mean pizza craving. Hey, what can a girl do?? It was worth the wait though.


Gluten Free & Vegan Pepita Burgers
(the closest thing to the burger grail so far)

Ingredients:
• 1/2 cup onion, diced
• 1 large garlic clove, minced
• Flax eggs: 2.5 tbsp ground flax + 1/2 cup warm water, mixed in bowl
• 1 cup oats, processed into flour
• 1/2 cup pepitas (Spanish pumpkin seeds)
• 1.5 cups gluten free bread crumbs (I processed 3 pieces sunflower flax bread)
• 1 cup local grated carrots
• 1 cup cooked black beans, rinsed and pureed
• Heaping 1/4 cup finely chopped parsley
• 1/3 cup almonds, chopped
• 1 tbsp. Extra Virgin Olive Oil
• 1 tbsp gluten free soy sauce
• 1.5 tsp chili powder
• 1 tsp. cumin
• 1 tsp. Italian seasoning
• Kosher salt and black pepper, to taste

For the 2 burger toppings:
• 2 gluten free hamburger buns
• 2 thick slices local tomato
• Spicy guacamole (I bought Whole Foods brand to save time)
• ½ cup local spinach
• 2 tbs dijon

Directions:
Preheat your oven to 350F and lightly grease a cookie sheet. In a large skillet, heat oil and add garlic. Once you can smell the garlic aroma add your onion and sauté until translucent and slightly browned. Mix your flax egg together in a small bowl and set aside for at least 10 minutes while you prepare the rest of the ingredients.

Prepare the rest of the ingredients as noted. I used my food processor and kept adding them into a large bowl, leaving the spices out to mix in last for taste testing. Once all ingredients are in the bowl mix well. The flax egg should help everything stick together. Add seasonings and salt to taste.

Roll out 8 balls to make sure all patties are equal size then shape dough into tightly packed patties, lightly wetting hands in between each patty to prevent sticking. I formed mine right onto the cookies sheet.

Bake for 15-17 minutes on each side. They should hold together for flipping but be gentle! Serve between those delicious buns holding all your scrumptious toppings.

I roasted local corn for our side! So easy to do in your oven. Just pop them in at 350F for 30 minutes, remove from oven and peel back husks. A little earth balance and pepper graced my little kernels!

Tuesday, June 14, 2011

"this is the way I eat my Peanut Butter Cup..."

I don’t have a big sweet tooth but I love putting together desserts. Baking is getting easier each time (minus the occasional GF monster surprise) and I love the smiles I get from my loyal family taste testers.

Lately I have been obsessed with looking at vegan and raw desserts online. I find no bake sweets fascinating and quite frankly a big relief when I don’t have to pray and dutifully check my oven window every 5 minutes. Some of my recent favorites have been frozen banana soft serve, cookie dough “blizzards”, and cookie dough balls dipped in chocolate. I know what you are thinking, “Didn’t she JUST saw that she didn’t have a sweet tooth?” Well, these desserts are not only GF and no bake, but they are also vegan and healthier for you. Plus, the recipes make small portions. Hey, I know it's bikini season but we are still allowed to treat ourselves every once in a while…

I had to show a lot of restraint to get a photo...
Last night I tested out a peanut butter cup recipe I found on http://www.loveveggiesandyoga.com/. I love Averie’s cooking because it is simple, healthy, and kid friendly. Her daughter gobbles up her healthy vegan goodies with no complaints! I was a big Reeses peanut butter cup fan in the past so I thought it would be fun to try. It was probably the easiest dessert I have ever made! No food processor, no baking, no fuss, and no long list of ingredients. In fact, I had everything in my kitchen pantry! I have been keeping vegan chocolate chips or karob chips around for my chocolate chip cookie dough ball obsession (recipe to come!).

I of course added a couple things to the recipe but feel free to play around with it to your own taste buds desire! You can find her original recipe here: Averie's Raw Vegan 10 Minute Peanut Butter Cups


These make 2 good size cups. I don’t know about you but if it’s in front of me I will eat it so I prepared portion controlled cups!

Vegan 10 Minute Peanut Butter Cups

Ingredients

Rich Peanut Butter Goodness!
• ½ cup vegan chocolate (I used vegan chocolate chips)
• 2 tsp nutritional yeast
• 2 tablespoons organic creamy peanut butter
• 2 tsp agave nectar
• Pinch kosher salt
• 2 tsp organic pure vanilla extract

Directions

Melt ¼ cup of the chocolate in the microwave (about a minute). Fill the bottom of 2 muffin liners evenly with the melted chocolate. The muffin liners give it the rippled edges like a real reeses.

Mix together peanut butter, honey, yeast, salt and vanilla. If your yeast isn’t mixed well you can microwave it for about 10 seconds. Spoon desired dollop onto the semi hardened chocolate base.

Melt the remaining chocolate and pour evenly over the peanut butter. Put into the refrigerator for at least 10 minutes.

Peel wrapper and enjoy! They are pretty rich so one was plenty for me and my husband. I am sure you can make big batches though pretty easily. I see party ideas in the future!

Monday, May 23, 2011

Rudi's OH-some Onion O's

My entry for Rudi's Gluten Free Cooking Contest:
Rudi's OH-some Onion O's
Gluten free, Baked, Kid and Adult Tested and Approved!

I am so excited to share with you my entry for Rudi’s Gluten Free contest. I have come up with a recipe that can be used as an appetizer, snack, or side. It can be dressed up for the party with its accompanying dipping sauce, or hang out beside you on a casual football Sunday. Whichever you choose, I can promise you that these little O’s are oh so delicious.

I wouldn’t necessarily call fried food a foe, but it is certainly not a friend of mine. For one, those oils can be contaminated and two they don’t often sit well in this Indie’s tummy. So, since I have been mastering the art of using cooking alternatives I have come up with a gluten free, healthier onion ring. Now, who can resist the leaning tower of crispy onion goodness glistening from my menu? Especially if you take out the frying and replace it with baking. A classic southern concoction that cuts calories and adds flavor is something I know that I personally cannot resist!

I experimented in the kitchen with many different ingredients and recipes. One of the challenges I ran into was deciding on which milk would bring the best flavor to the rings. I decided that since I feel better when I do not indulge in a lot of moo-cow dairy that I would use soy milk in my recipe, however please feel free to use whatever milk your little heart (or tummy!) desires.

These little O's were so delicious! I had to beat away my husband and inlaws so I could snap a picture for the contest before they gobbled them up. Yum to the last crumb!

Please go online to Facebook and vote for my recipe! The first round is based on facebook votes and I would love to have the chance to be considered by the panel of judges!


Rudi's OH-some Onion O's

Ingredients:
•2 slices Rudi's Orginal Gluten Free Bread
•2 Vidalia Onions
•1/2 cup rice flour
•Kosher Salt
•Black Pepper
•Cayenne
•Italian Seasoning
•1 tbs Canola Oil
•Olive Oil Spray
•Ground Chia or Flax seeds
•Soy Milk (or milk of choice)

Instructions
Preheat your oven to 450 degrees F.

Place 2 slices of day old Rudi's Gluten Free Bread in your food processor with 1/4 cup of rice flour. Add a pinch of salt, pepper, itlaian seasoning and cayenne. Pulse a few times then add oil. Process for about 30 seconds or until crumbly. Place your delicious homemade breadcrumbs in a shallow dish.

In a bowl combine 1/4 cup rice flour, chia egg (1 tbs ground chia and 3 tbs water), and 1/2 cup soy milk. Whisk until combined and formed into batter consistency.

Slice your onions into 1/2 inch circles and separate into rings. Wipe tears away from handling onions! Keep the larger rings and save the others for later. Place all your rings in a bowl and cover with milk, letting them soak while your oven finishes heating.

At the sound of the 'beep' dip your onion rings into the batter then the bread crumbs. Spray a cookie sheet with olive oil spray and place your little O's on the sheet. Spray the top of the rings as well so they crisp nicely.

Bake for 8 minutes then flip and bake for another 6-8 or until they are golden brown.
Serve warm and enjoy the compliments!

Tuesday, April 26, 2011

Rudi's Gluten Free Cooking Contest!

Oh yes. I feel like I am ready to put my gluten free cooking skills to the test. I was tickled when I recieved an email from Rudi's telling me all about the new Gluten Free Cooking Contest they are launching! A thousand thoughts ran through my head. Oh the opportunities, the recipes, the taste testing! I knew I needed to get started right away. Also because the contest began on April 18th. Times tickin' till June!


Here is the lowdown:
Rudi’s Gluten-Free Bakery, maker of unbelievably good gluten-free baked goods, announced the Unbelievably Good Gluten-Free Recipe Contest on April 18th. Inspired by the passion and creativity of gluten-free foodies everywhere, Rudi’s Gluten-Free Bakery fans are encouraged to share their gluten-free culinary masterpieces in the Unbelievably Good Gluten-Free Recipe Contest for a chance to win a free trip to Boulder, Colo., star in their own online cooking show and be featured in a national media advertisement for Rudi’s Gluten-Free Bakery!


April 18th through May 20, aspiring gluten-free chefs are invited to visit the Rudi’s Gluten-Free Bakery Facebook page and click on the recipe contest tab to enter. Rudi’s wants fans to get creative with gluten-free bread and some ter-RUDI-ific gluten-free recipes. There are only two recipe requirements:

1. The recipe must be gluten-free.

2. The recipe must include at least one product from the Rudi’s Gluten-Free Bakery line (Original, Multigrain and Cinnamon Raisin Breads, Multigrain Hamburger Buns and Hot Dog Rolls, and Original Pizza Crusts).

All types of recipes are welcome, from kid-approved options to fine dining fare. Along with the recipe, Rudi’s wants to hear why gluten-free cooking is important to the aspiring chef.

“We created Rudi’s Gluten-Free Bakery to help people suffering from celiac disease and gluten intolerances enjoy great tasting, healthy baked goods that have the same taste, texture and appearance of regular options,” said Doug Radi, vice president of marketing for Rudi’s Gluten-Free Bakery. “We’re continuously amazed by the culinary creativity, passion and inspiration within the gluten-free community, and we can’t wait to see the exciting ideas our fans cook up. We’re looking forward to meeting the top three finalists in June for a gluten-free recipe showdown and celebration.”
Recipe submissions will be accepted until May 20, 2011, and online voting will continue through June 6, 2011. The top 10 fan favorites, determined by the number of Facebook votes, will each receive a $250 gift card to Williams-Sonoma, an assortment of Rudi’s products and swag, and a chance for their recipe to be chosen as a top three finalist.

From the top 10 fan favorites, three finalists will be determined by a panel of judges including:

· Chef Jeffrey Barbour, Restaurant 4580

· Martin Hammer, owner of Restaurant 4580

· Chef Dan Kohler from Renegade Kitchen and Alternative Appetites

· Jane Miller, CEO of Rudi’s Gluten-Free Bakery


The top three finalists will receive a trip for two to Boulder, Colo., home of Rudi’s Gluten-Free Bakery, where they will compete in the Final Recipe Cook-Off at Restaurant 4580 on June 24, 2011. The grand prize winner will star in a National Foundation for Celiac Awareness – Alternative Appetites cooking show with Chef Dan Kohler of Renegade Kitchen and be featured in a national media advertisement for Rudi’s Gluten-Free Bakery. For complete contest and prize details, visit the Rudi’s Gluten-Free Facebook page and click on the Recipe Contest tab.

Dates to Know:

· April 18 – May 20: Recipe submissions accepted on the recipe contest tab on the Rudi’s Gluten-Free Bakery Facebook page

· April 18 – June 6: Online voting open to the public

· June 7: Top 10 fan favorites announced

· June 7 – June 13: Top 10 fan favorite recipes reviewed by panel of judges

· June 13: Top 3 finalists announced

· June 24: Top 3 finalists compete in Final Recipe Cook-Off at Restaurant 4580 in Boulder, Colo.


A bit about Rudi's...

Rudi’s Organic Bakery, Inc., founded and headquartered in Boulder, Colo., is the only nationally available brand offering a full line of certified organic bread and baked goods. Rudi’s Organic Bakery has a long history of baking bread a better and brighter way, by using simple organic ingredients that contain no artificial ingredients, preservatives, high fructose corn syrup or trans-fat. Since 2005, Rudi’s Organic has been a part of Charter Baking Company, Inc., a portfolio company of Charterhouse Group, Inc. Rudi’s Organic is a premier organic brand with distribution throughout the U.S. in both natural foods stores and mainstream supermarkets. Founded in 1976, Rudi’s Organic offers small batch organic artisan breads, sliced sandwich breads, wide pan sandwich breads, hamburger and hot dog buns, wraps and a popular line of organic spelt breads, buns and tortillas. In July 2010, Rudi’s Organic Bakery launched a new line of natural gluten-free products under the Rudi’s Gluten-Free Bakery brand. Follow Rudi’s Gluten-Free Bakery on Facebook, Twitter, and Rudi’s Gluten-Free Blog, Baked on the Bright Side.
 
If you want to learn more about the contest, company or products, you can visit them online at http://www.rudisglutenfree.com/
 
 
I am very excited to concoct some gluten free goodness in my kitchen and enter my recipe! I will be leave for Europe in a couple days and cannot WAIT to bring back some recipe souvenirs ;) Hope to have all your support in my endeavour and I look forward to providing you with a delicious new recipe!

Wednesday, March 23, 2011

Burger. What's in a Name?

What's in a name? That which we call a burger by any other name would smell as savory…


Burgers. We all love ‘em. And that is exactly what was on the menu last night! But like dear Juliet portrayed in her soliloquy, this burger is far more than its mere given title. This is not your meat packed patty that pops in your noggin when you hear ‘burger’. No, this burger is better is better than that. Yes, I am calling you out. My burger is better than your burger.

Nanner Nanner Boo Boo.

This burger is packed with protein, and oh was it delicious! I saw the recipe on “Oh She Glows” and knew that my first homemade veggie burger would be this one. A couple gluten free adaptions and we were ready to go! Obviously these can me made with non gluten free ingredients as well. So let’s bust out the food processor and start patty cakin’ those veggie patties together. Oh and if your grill has not shed its winter cover, no worries! These are baked to goodness in your oven!

Vegan & Gluten Free Lentil-Walnut Burgers

Ingredients:
• 3/4 cup lentils, picked over and rinsed
• 3/4 cup walnuts, toasted
• 1 piece gluten free bread, toasted OR 1/3 cup GF breadcrumbs
• 1 tsp ground cumin
• 2 tsp ground coriander
• 1/4 tsp red pepper flakes
• 3 cloves garlic
• 1/4 tsp sea salt
• Freshly ground pepper
• 1 tbsp extra virgin olive oil
• 1 chia/flax egg (1 tbsp ground chia or flax + 1/4 cup water)

Directions

Preheat oven to 350F. In a small bowl make the chia or flax egg and set aside. Place lentils in a small pot and add a couple cups of water. Bring to a boil and simmer for about 25 minutes. Remove and rinse in colander.
While the lentils are cooking, toast the walnuts by placing the walnuts on a baking sheet and cooking at 350F for about 12 minutes until golden brown and delicious. Let cool.

In a food processor, process the garlic, walnuts, toasted bread OR breadcrumbs, garlic, spices & seasonings until combined. Now add oil and lentils and pulse until coarsely chopped (some lentils should be visible and left chunky). Add the flax or chia egg and pulse a bit more until combined.

Now shape 4 patties with hands and place on a baking sheet lined with parchment or a non-stick mat. Bake at 350F for 20-22 minutes on each side for a total of 40-45 mins. bake time. Makes 4 patties. Adapted from Martha’s Great Food Fast Cookbook from the Blog Oh She Glows.

We topped ours with fresh spinach and ripe tomato. The tomato is a must! I was planning on adding guacamole but they had over ripened. But no worries, we have 2 left for tonight and I am headed to the store at lunch to pick up some avocados!

Our burgers didn’t need the whole 22 minutes once they were flipped. I was being careful that didn’t turn out too dry either. Make sure that you make your patties even. If the ends are thinner they are likely to dry out an burn. Nobody wants a burned burger.

I have yet to find a Vegan & Gluten Free Bread or Hamburger Buns so unfortunately I strayed from my vegan diet last night. One step at a time. I have cut out milk and cheese. Eggs were baked in this bread but I have been cutting them out otherwise. If you know of any gluten free/vegan breads let me know!

I cannot wait to experiment with different recipes after making this one. Of course I will be changing it up and posting new ones for you!

Friday, February 4, 2011

He's A Magic Man

Savannah enjoyed the snow days!
The great blizzard of 2011 hit Tulsa Oklahoma this week. If you aren’t from Tulsa, you should know that we usually shut down with a couple inches of snow. Almost 15? We are in crisis mode. We were in a state of emergency before you could muster out the word snowpocalypse.


My husband and I took heed to the warnings and prepped accordingly. Our pantry was stuffed to the brim, our refrigerator stocked with all the necessities, and our freezer was exploding with frozen veggies and gluten free breads. Looking at it all, I felt like we were prepared to not leave our house for about a month, but when the ravenous cabin fever hit us all at the third day I can assure you we made quite a dent in our stash. Yes, those mounds of silvery candy wrappers in the bin are mine. Don’t judge.

The plus side of the storm was that we set a delicious menu for the entire week together, picking warm, hearty, and time consuming dinners. It was so enjoyable smelling the 15 bean soup simmering on the stove, corn muffins basking in the oven light achieving the perfect lightly golden tan…rocking to jazz with a full bodied glass of cabernet sauvignon. Ah, this blizzard was bliss.

But it’s not the 15 bean soup that I am sharing with you today. It’s something my husband cooked up. One of my FAVORITE things he cooks up. Mushroom Risotto. Creamy Arborio rice oozing with freshly grated parmesan cheese and folded into plump cremini mushrooms. Decadent. Delicious. And, I am drooling on my keyboard.

I have prepared this dish before, but there is just some hint of little magic in my husband’s hands that make it that much more delicious. So, cheers to him! And cheers to me for having the sense to marry the ol' cook!

Mushroom Risotto

• 6 cups organic chicken broth

• 2 tbs EVOO

• 1 lb cremini mushrooms

• 1 ½ cups Arborio rice

• ½ cup white wine (we used sauvignon blanc)

• Salt & pepper to taste

• 1/3 cup freshly grated parmesan

In one pot warm broth over low heat. In another pot heat the olive oil and add your mushrooms and coat. Sautee until they are soft.

Remove the mushrooms and set aside. Add your rice to that pot. Pour in your white wine and let the rice absorb all the liquid. Add ½ cup chicken broth and stir until absorbed. Continue to add ½ cup chicken broth at a time and stir continuously until the rice is al dente, about 15-20 minutes.

Remove from heat and add your mushrooms and parmesan. Add salt and pepper to taste.
Plate and enjoy!!

Monday, January 17, 2011

New No Bake Memory

There is always that cookie that reminds you of your Yiayia’s (grandmother’s) house. That cookie that sparks so many memories. Whether you made it with just her, or with your mum, or your cousins, or occasionally if you were feeling nice, your little sister. Have it in your head? Are the sweet smells swarming around you as you read these words?

THAT cookie for me would be No Bake Oatmeal Cookies.

I remember the smells and sounds of her kitchen while we prepped and prepared these sweet little gems. We would anxiously circle my Yiayia while she stirred the peanut butter and chocolate, her always grabbing the oats at just the right time. We would anxiously grab our spoons and clump the mixture onto wax paper, our breaths growing quicker as we tried and get the cookies on before they cooled in the pot. After the stressful task of dolloping we would enjoy the bits of batter that stuck to our spoons. Then we waited. I cannot say patiently because inevitably one of us would end up with chocolate dipped fingertips from ‘testing’ to see if they had dried. Anyone who has made these know that you can visually tell when they have dried on the wax paper but we pretended that we didn’t of course.

Unfortunately my friends, when I have made these mementos outside of my Yiayia’s kitchen it’s just not the same. Maybe the memories that were created in her kitchen are so closely attached to that recipe that nothing can really compare. All the more reason to create something just as memorable though right? And lucky for me, one of the blogs I follow posted a no bake vegan almond butter chew recipe for me to try. Only 5 ingredients and 5 minutes of my time. Which was perfect timing for me because my son had a sleepover and I had to sate their sweet tooth cravings STAT. Trust me, if two hyper first graders demand sugar, you provide sugar. Unless you have a death wish.


I varied from “oh she glows” blog’s recipe slightly in ingredients but obviously our directions our the same.

Here is the link to her recipe:
http://ohsheglows.com/2011/01/05/5-minute-5-ingredient-no-bake-almond-butter-chews/

No Bake Vegan Almond Butter Chews

•1/4 cup chunky all-natural almond butter
•1 ½ tsp pure vanilla extract
•1 cup rice crisp cereal – I used Nature Path’s Organic Koala Crisp
•3 tbsp organic brown rice syrup
•2 tbs chopped bittersweet organic chocolate – I found a small container in the produce section of whole foods that was delicious!

Line a plate with parchment paper. In a medium sized bowl, stir together the almond butter,

brown rice syrup, and vanilla. Microwave on high for 45 seconds. Stir well and immediately add in the rice crisp cereal and chocolate. Stir until all the cereal is well coated.
Wet your hands thoroughly and shape the mixture into ‘golf-balls’. Press mixture together firmly so it will hold. Wet hands after each ball is formed so the mixture will not stick to your hands. Trust me you need to do this or you will make a sticky mess. Plus it makes it so much easier to form the cookies.

Place the balls onto parchment paper and freeze for 10 minutes. You can keep these chews in the freezer in a sealed container. I really enjoy them straight from the freezer. They remain nice and chewy.
Her blog Makes 7 golf-ball sized chews. I somehow managed 10-12 chews but I tend to not exactly measure my ingredients. Guilty… but I ended up with more chews so we aren’t complaining!

Monday, January 10, 2011

One Love, One Heart, One Gluten Free Pizza

Gluten Free pizza seems to be popping out of many restaurant ovens these days and I am lovin’ it! I have sampled Joe Mommas Pizza in the past and was pleased. I have tried Gina & Giuseppe’s pizza and it was quite delicious. But my friends, alas there is only ONE LOVE, ONE HEART, and ONE GLUTEN FREE PIZZA that truly tickles all the right pizza taste buds. A pizzeria that offers both Chicago style pizza AND gluten free pizza. A pizzeria where them belly full but we [AIN’T] hungry no more. A pizzeria where I don’t envy the deep dish pizza on my husband’s plate because mine is just as doughy and delicious. A place where I can get together and feel alright about eating gluten free at a restaurant. Enough hints? Well alright…


My no gluten, no cry pizza stop that satisfies my pizza cravings. So long cracker thin crust and hello again deep dish! Well, about as deep as gluten free goes.

I accidentally stumbled into this gluten free glorious revelation when my husband suggested we meet my parents there for dinner. I have been eating vegan/vegetarian anyway so I figured I would order a salad with some veggies and be on with my life. Pizzerias are never really my first choice when choosing dinner because I have to endure the wafting smells of oven baked goodness while I munch on lettuce. Don’t get me wrong, I love salads, but not necessarily in this setting. I went online and checked out the menu and saw that they offered gluten free. Wait, WHAT? Wow…You had me at local pizzeria. Add the clever name, setting, location (close to my house!) AND gluten free…Can someone pinch me please?

I have been back three times now, and it gets better every time. Especially yesterday.

I ordered a spinach, artichoke, and mushroom pizza and was blown away. Thick crust held a layer of savory and sweet marinara sauce.

Veggies were piled on with abandon. Then a gooey, stringy, melty (yes melty) mozzarella coated the top. AHHHHH. I be jammin’ with this place as much as possible.

The restaurant itself is a fun lovin' place to be. Surrounded by walls in an organized chaos of concert posters and the greatest musicians, TVs that blare the latest sports games, and the promise of live musical acts to come soon can't get any better in my opinion.

Bob Marley once said, “One good thing about music, when it hits- you feel no pain”. I agree. And I adopt my own quote inspired by both him and my new pizzeria love. “One good thing about Marley’s g-free pizza, when it hits-you feel no pain.”

http://marleyspizzeria.com/
Marley’s Pizzeria
6104 E 71st Street
Tulsa, OK 74136
918-551-7744

Thursday, January 6, 2011

SOya long Meat!

I have been on my veggie kick for a little over a week now and I am so excited to share a couple recipes that I have picked up. After doing a lot of research on vegetarian and vegan diets, I decided that it’s something I want to slowly adopt. I have tried the 30 day vegetarian challenge before and I craved meat like crazy! But this time is different. Want to know why? (start nodding your head because you know I am going to tell you anyway)I am cutting out the deprivation thoughts. That’s it! That’s my secret to living a healthy and happy lifestyle.

I was inspired by a blog my friend sent me recently (thank you to Laura Law) called “Oh She Glows”. I highly recommend you go and check it out, http://ohsheglows.com/. Angela's view on life and diet was truly inspiring and I decided that is what was wrong with my past diet trials. I openly went into my gluten free diet because I had to cut out gluten. It wasn’t a choice. But going vegetarian/vegan IS a choice. A choice that I can choose to carry out. If I want a piece of chicken for dinner, by golly I am going to have it! But to tell you the truth, in carrying on this perspective, I haven’t wanted it. Me, a turkey, chicken, occasional medium-rare steak lover DOES NOT want it. No cravings because there are no restrictions.

It’s been only a little over a week but I still want to give myself a pat on the back because I know this adopted way of living will bring me to what I want…you remember my resolution right? A Happy & Healthy Lifestyle.

Okay, dinner time. My temptation to try vegan options quickly turned into a Tempehtation when I was exploring whole foods vegan section. I love tofu and have cooked with it often but have never tried tempeh. Nothing against, just haven’t grabbed it. Like they say, don’t knock it till you try it! And try it you should! I am talking to you dear readers-meat lover or not.

So what exactly IS Tempeh?

“Tempeh originated from Indonesia, where it is still an important food. Tempeh is cake of soybeans, which have been de-hulled, cooked, mixed with a tempeh starter (culture of Rhizopus oligosporusor Rhizopus oryzae) and incubated for a day or two.

The white mycelium of the Rhizopus mold keeps the soybeans together to form a solid cake, which you can easily sliced.
In Indonesia, tempeh is traditionally made from soybeans only, but in Western countries you can find tempeh made from other ingredients, such as vegetables, grains or other beans. Since tempeh is made from whole soybeans, it is a fiber rich food. Tempeh is a rich source of proteins, minerals, soy isoflavones and saponins. It is also a generous source of nutrients such as calcium, B-vitamins and iron. IN addition, tempeh is a good source of monosatuarated fats and contains no cholesterol. The natural tempeh fermentation process also makes the soya more digestible. Tempeh has grown so much in popularity that it is now available in the refrigerated section of many supermarkets. Of course, you can also find it in health food stores oriental shops.” www.soya.be

Informative lesson over let’s talk food. I sampled two different marinated tempeh flavors from whole foods. I was meant to try it I decided because the packages were on sale 2/$6! Ah I love it when fate leads me to scrumptious adventures.
So hear are two recipes we tried out the last two nights. One using coconut curry tempeh

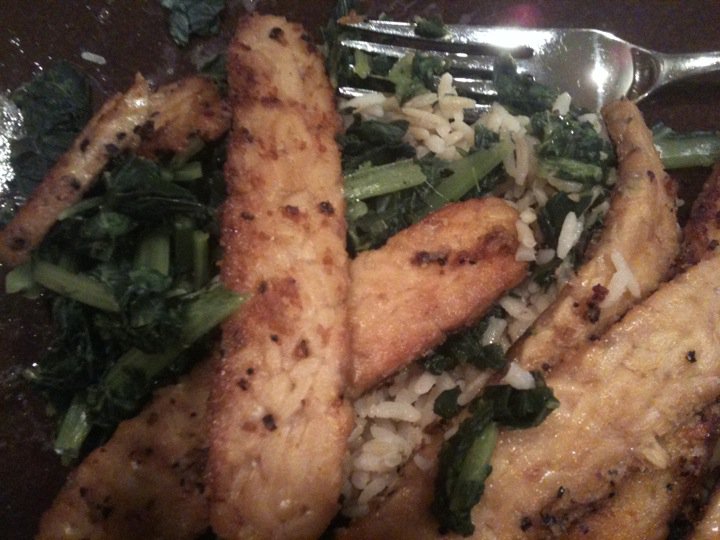
, the other lemon pepper tempeh.

Delicious, nutritious and delightfully easy to make! Let’s face it, most of us work late and we need a meal in under 20 minutes when we get home that isn’t delivered in a greasy box or plucked from the pantry in a can. Both these meals are well under 20 minutes. Take that Rachel Ray! My husband and I were delightfully full and content. Meat was not missed I assure you.

Coconut Curry Tempeh with Brown Rice Vegetable Medley

•1 pkg coconut curry marinated tempeh
•1 package Uncle Bens Instant Brown Rice
•2 cups organic frozen vegetables (lima beans, carrots, peas, green beans)
•2-3 tbs EVOO

I used a short cut and bought the instant uncle bens brown rice that comes measured out in 2 cup servings that boil on the stovetop quickly. Drain well and set aside.

Steam vegetable medley, drain well, and mix into rice. Divide onto two plates.

Heat EVOO in a pan until hot. Place tempeh into the pan and brown all sides, about 2 minutes each side. Place over rice & vegetable medley and enjoy!


Lemon Pepper Tempeh with Leafy Greens & Brown Rice

•1 pkg Lemon Pepper Tempeh
•2 cups 365 organic Leafy Greens mix (kale, collard greens, spinach)
•1 pkg uncle bens instant brown rice
•2-3 tbs EVOO

Steam your leafy green mix on the stove top. Drain well.
Cook your Rice and mix, drain well and mix with leafy greens. Divide onto two plates.
Heat EVOO in a pan until hot. Place tempeh into the pan and brown all sides, about 2 minutes each side. Place browned strips over rice and greens. Enjoy!

Wednesday, December 29, 2010

Let's Start a Roasting Revolution

I have been hearing a lot of talk of New Year’s resolutions and it’s gotten me thinking about all my past resolutions. Some worked, some didn’t. Some I whole heartedly tried to follow through with and others I figured

if I said it out loud that would make enough of a difference. We all want to drop those pounds, and eat healthier, and take up YOGA and Japanese and whatever outlandish opportunity we feel we need to embark on. It’s not that I am being pessimistic people. I think it GREAT to think BIG. But what we end up missing is the BIG picture. What are you going to do to stay on track? What is going to motivate you? Who is going to make sure you stick to it?

We want to make all these BIG changes. But what we really need to do is look at the little things we can do to make a BIG change. Let’s face it. I am probably not going to be fluent in Greek by next January (sorry yiayia) but it wouldn’t hurt to learn some useful conversation that doesn’t involve cursing. See, baby steps.

So with all that mumbo jumbo from the heart and off the subject of food, which is I hope why you are really here and taking the time to read my blog, I will get to my point. My new year’s resolution is to be as happy and healthy as I can be, and my baby steps will be through my cooking dear readers. As I am writing this I can see the words of my last few blogs about cookies and Christmas time just drenched in sugars and sinful seduction. We all have to indulge every once in a while though. I think I will make that part of my “happy life” resolution. No worries, the cookies will keep coming.

Onto the healthy food part of my resolution, I am going to start cooking more with vegetables, and have them be the main star of the show on my plate. I’m going green in my kitchen! I love meats so therefore they tend to rule the menu, but after much research on healthy eating and a healthy diet, I have decided that little drumstick needs to be downsized. Snacking on healthy foods between meals is a must as well and I am on a hunt for a plethora of choices that are easy to grab and go, whether it’s breakfast, lunch, dinner or a snack.

Today the lunch item/snack is roasted edamame. I picked my lunch up from whole foods the last couple days and sampled some of their vegan options to get some ideas.

I ran across these green little health monsters and boy did they WOW me! I had to go find that recipe. Unfortunately the exact one was not on their website, but I found one that is quite close. Add some roasted red peppers and green olives to this recipe and you have a match made in heaven.

Roasted Edamame

•2 teaspoons olive oil or 2 teaspoons vegetable oil
•1/4 teaspoon dried basil, crushed
•1/2 teaspoon chili powder
•1/4 teaspoon onion salt
•1/4 teaspoon ground cumin
•1/8 teaspoon paprika
•1/8 teaspoon black pepper
•1 (10 ounce) package ready-to-eat soybeans, thawed if using the frozen variety (fresh or frozen, edamame)

Preheat oven to 375°F. In small bowl, stir together oil, basil, chili powder, onion salt, cumin, paprika and black pepper. Drizzle mixture over soybeans and toss to coat well. Arrange beans in a single layer in a shallow baking dish. Roast, uncovered, for 12 to 15 minutes, stirring once, until soybeans begin to brown.
Serve hot as a vegetable side dish or cooled as a snack.

Monday, December 27, 2010

A Very Cherry Christmas

My husband has been craving all things cherry the last few weeks. Cherry shakes, cherry cobbler, cherry this and cherry that. So of course when the

local newspaper featured a huge story on the 12 days of Christmas cookies, my husband zoned in on, you guessed it, the cherry icebox cookies. Shocking I know.

Now those of you who have followed my blog know that gluten free baking and I have had our showdowns in the past and that I have been sticking to cookie dough that steers clear of substitutions that potentially forecast a doughy flood in my oven. I make non gluten free goods for him all the time, but I was feeling rather brave yesterday. Maybe it was because I had my son home with me and he is always willing to fearlessly dive into whatever project I come up with that day. I decided that I needed to woman up and take whatever consequences this adventure threw at us. Plus my son would no doubt get a kick out of the mess that was likely to ensue on my counters and in my oven. What we mothers do to bring a smile to our little one’s faces.

After returning from the store with our ingredients and new found spunk towards the wintery afternoon’s culinary exploration, we tied our apron strings, laid out our tools on the counter, and began a sweet discovery into cherry bliss. Which of course started with breaking into the cherry jar and popping two or three in our mouth at a time. Hey, we needed all the energy we could get!

After the prep work had been finished , our aprons and faces sprinkled with sweet rice flour, and the dough nestled into saran wrapped cocoons in the refrigerator to cool, we kicked up our feet and admired the first round feat.

A couple outdoor games, art projects, and one Polar Express movie later, the cookie dough had cooled and the two us got our hands dowsed in dough once more as we sliced and situated our cookies on the pan. 9 minutes later a taste test.

Perfection.

Sweet Perfection that melted in our mouths. Oh, these cookies will for sure make Santa’s cheeks a little pinker and the twinkle in his eye a little brighter this year. This recipe makes enough cookies to satisfy Santa, the reindeer, and most the elves so expect to be sharing! Tis the season for that anyways though right? They would make darling presents for coworkers or friends. Just jazz them up in fun holiday trimmings and make everyone’s spirits bright!

Cherry Icebox Cookies

•1 cup butter, softened
•1 cup sugar
•1/4 cup organic packed brown sugar
•1 large organic egg
•4-1/2 teaspoons lemon juice
•1 teaspoon Pure Vanilla Extract
•3-1/4 cups sweet rice flour
•1/2 teaspoon baking soda
•1/2 teaspoon ground cinnamon
•1/2 cup chopped walnuts
•1/2 cup chopped maraschino cherries
•1/3 cup maraschino cherry juice


In your mixing bowl cream your softened butter and both sugars until light and fluffy. Then beat in the egg, cherry and lemon juices. Slowly add your vanilla. Pour all dry ingredients in a separate mixing bowl and whisk until thoroughly combined. Then gradually add to the creamed mixture and mix on medium until well combined. Remove from your mixed and carefully stir in walnuts and cherries.

Divide the dough into 4 even parts and roll into a cylinder shape. The dough might be pretty thick. Wrap each in plastic wrap and refrigerate for about 3-4 hours or until firm.

Remove dough just before baking. Heat oven to 375 degrees. Unwrap a roll and cut into quarter inch slices. Place 2 in. apart on ungreased baking sheets. Bake at 375 for 8-10 minutes or until the edges begin to brown. Remove to wire racks to cool.

This recipe makes about 6 dozen cookies depending on how much dough actually makes it to the oven!

Monday, December 20, 2010

Easy G~Free Cookie Recipe

With Christmas caroling its way into our daily agendas, I am constantly surrounded by all sorts of treats. Christmas cards, Christmas candy, Christmas cookies…and therefore Christmas LBs.

But hey, it’s an excuse to indulge right? As long as I can hide out in my Christmas sweaters I will be a jolly ol’ Indie.

Christmas parties have been in full swing, and potlucks have popped up all over my calendar. So the question arises, “What goodie will I bring to this fete that I can eat, and I won’t subject my friends to unfamiliar grounds?” I always made sure that I brought something equally as healthy as it was pleasing. Now I have to add in the factor of of being able to devour my own dish as well. Appetizers, main dishes, sides are no sweat.

It’s the dessert my friends. The perfect ending to a meal.

The easy, go-to dessert to be exact. And what USED to be my favorite things to make? Cakes, cookies, and cupcakes. Even if I bought a boxed start to my desserts, I jazzed it up with added ingredients or my own toppings. But my dear friends, the easy grab a box off the shelf days seem to be over. At least I have not really had success with the pre mixed concoctions that I have purchased. In the four I have tried (I will leave names out as I do appreciate the company's consideration)they don’t bake right, taste grainy, or have a mudslide consistency. Maybe I am just not used to the stuff, but I don’t have the time or money this season to try every gluten free box of potential potluck pound cake.

I could make a homemade dessert that I am sure will turn out lovely, but when you are on the clock you don’t have time to spend collecting 20 different little ingredients that you will pay five bucks a piece for, need one tsp, then not need to use the ingredients for another couple weeks. By then, you are worried that the baking agents won’t hold up as well. Or maybe I am just paranoid about it's shelf life and what little I honestly know about it right now. In my own defense I took a big hit on the dessert front when I was diagnosed and havoc ensued. But that is here nor there, and I still need a dessert with less than 20 ingredients.

Much research again brought me to another “Duh, why didn’t I think of that” moment.

I have made sugar cookies and peanut butter cookies PLENTY of times in the past, and some don’t require any flour at all! Duh, Duh, Duh Mrs. Indie. I am a natural blonde, if you couldn’t tell.

Anyhoo, with those two cookie bases, my options are once again endless. An egg, sugar, vanilla extract, and some peanut butter, and I am back in the game my dears! I can top my cookie concoctions with peppermints, chocolate, nuts, fruit,assorted candies, sprinkles, frosting… I digress. My sweet tooth began to buzz.

Below is a go to peanut butter cookie recipe with holiday topper ideas

that will bring you holiday cheer, and have you smiling from ear to ear. Oh dear, Christmas has this blogger rhyming too much now I fear.

Gluten Free Peanut Butter Cookies
•1 large free range organic egg
•1 cup sugar
•1 cup organic peanut butter
•1 tsp kosher salt
•1 tsp vanilla extract (optional but I like what it brings to my baking)

Preheat you oven to 350.

Mix all ingredients together in a bowl. Roll into balls and place them on a greased baking sheet. Press a fork dipped in sugar in criss-cross pattern (your cookies will be slightly flatter).

OR take advantage of cookie cutters! Instead of rolling your dough into balls, flatten out your mix on a sheet and press away with holiday designs!

Bake at 350 for 8-10 minutes.

If you plan on topping with candy:
Let cookies cool on a wire rack until they are just a little warm. You don’t want to melt your topping, but you also want it to press far enough into the cookie to stick.
Press your candy into the cookie and serve!

If you plan on icing or sprinkles:
Let cookie cool completely before adding your iced decorations. I like to buy vanilla icing and add green or red food coloring. To make your own icing piper:I mix my frosting and food coloring in a bowl, then spoon it into a ziploc bag with a spatula. Press the frosting into one tip, and then snip a little off the corner depending how thick you would like your piping. This allows you to have more fun with your icing details and look like a pro!

CHRISTMAS COOKIE TOPPERS (because I am ALWAYS in theme right?)
•Mini candy canes (whole or crushed)
•Hershey kisses
•Peanut butter cups
•Apple slices with cinnamon
•Red and/or green icing
•Red and/or green sprinkles
•Dried cranberries
•Red/Green holiday m&m’s (peanut or plain)
•Almonds
•Walnuts (go crazy and candy them!)
•Shredded coconut (snowy pb cookies)

Monday, December 13, 2010

I'm Not Settling, I'm Substituting!

When I found out I couldn’t eat gluten one of the things that really tugged my heart strings was that I had just gotten involved with baking and gourmet cooking. Take a look at your recipes at home, and you see flour added to the majority of dishes. Whether it is a thickening agent, main component, or sidekick, flour dusts itself all over the cooking world.

But that alarming circumstance immediately got me thinking and researching. I was restricted to only 2 flours in my cooking, and there is a flour world out there I have never even thought of touching. Flavorful flours that can bring something new to the table. Why couldn't I just substitute a flour I COULD eat in for the flour that I was allergic to?

Simple enough right? But with substituting comes unexpected outcomes. So with much experimenting and research, I have become much more comfortable over the last 6 months substituing different agents into my meals.

So with that said, I will give you the flour list that I have taken so much advice from in my baking adventures. Gluten free or not, I encourage you to expand your horizons in cooking! Any ol’ john doe can just reach for the white or wheat flour…


Potato Starch Flour
This is a gluten-free thickening agent that is perfect for cream-based soups and sauces. Mix a little with water first, then substitute potato starch flour for flour in your recipe, but cut the amount in half. It can be purchased in a health food store.

Tapioca Flour
This is a light, white, very smooth flour that comes from the cassava root. It makes baked goods impart a nice chewy taste. Use it in recipes where a chewy texture would be desirable. It would work nicely in bread recipes such as white bread or French bread. It is also easily combined with cornstarch and soy flour. It can be purchased in a health food store.

Soy Flour
This nutty tasting flour has a high protein and fat content. It is best when used in combination with other flours and for baking brownies, or any baked goods with nuts or fruit. It can be purchased in a health food store.

Cornstarch
This is a refined starch that comes from corn. It is mostly used as a clear thickening agent for puddings, fruit sauces and Asian cooking. It is also used in combination with other flours for baking. It can be purchased in a health food store.

Corn Flour
This flour is milled from corn and can be blended with cornmeal to make cornbread or muffins. It is excellent for waffles or pancakes. It can be purchased in a health food store.

Cornmeal
This is ground corn that comes from either yellow or white meal. This is often combined with flours for baking. It imparts a strong corn flavor that is delicious in pancakes, waffles, or simple white cakes. It can be purchased in a health food store.

White Rice Flour
This is an excellent basic flour for gluten-free baking. It is milled from polished white rice. Because it has such a bland flavor, it is perfect for baking, as it doesn't impart any flavors. It works well with other flours. White rice flour is available in most health food stores, but also in Asian markets. At the Asian markets it is sold in different textures. The one that works the best is called fine textured white rice flour.

Brown Rice Flour
This flour comes from unpolished brown rice. It has more food value because it contains bran. Use it in breads, muffins, and cookies. It can be purchased in a health food store.

Kamut and Spelt Flours
These are ancient forms of wheat. While they aren't appropriate for gluten-free diets, they are excellent substitutes for plain wheat flour as they add wonderful flavor and consistency.

Substituting Gluten
Wheat flour contains gluten, which keeps cookies, cakes and pies from getting crumbly and falling apart. It is what makes baked goods have a good texture because it traps pockets of air. This creates a lovely airy quality that most baked goods possess when baked with traditional wheat flour. In order to help retain this structure when using non-wheat flours, gluten substitutes must be added to a gluten-free flour mixture. For each cup of gluten-free flour mix, add at least 1 teaspoon of gluten substitute. Here are three very good substitutes for gluten.

Xanthum Gum
This comes from the dried cell coat of a microorganism called Zanthomonas campestris. It is formulated in a laboratory setting. This works well as a gluten substitution in yeast breads along with other baked goods. You can purchase it in health food stores.

Guar Gum
This is a powder that comes from the seed of the plant Cyamopsis tetragonolobus. It is an excellent gluten substitute and it is available in health food stores.

Pre-gel Starch
This is an acceptable gluten substitute. It helps keep baked goods from being too crumbly. This, too can be purchased at most health food stores.

Substitution is the solution
If you are ready to try some recipes, start with recipes that use relatively small amounts of wheat flour like brownies or pancakes. These turn out lovely and the difference in taste is minimal. Here are two gluten-free flour mixtures that are suitable for substituting wheat flour cup for cup.

•Gluten-Free Flour Mixture I
1/4 cup soy flour
1/4 cup tapioca flour
1/2 cup brown rice flour

•Gluten-Free Flour Mixture II
6 cups white rice flour
2 cups potato starch
1 cup tapioca flour

**list from allrecipes.com

Also check out your local whole foods store to find pre mixed flours!

Tuesday, November 23, 2010

I’m Not Going Cold Turkey THIS Turkey Day!

I may be the only gluten free gal not shaking in her boots this year. I find it just as easy to enjoy myself on this holiday as I do every other day of the week. Why all the trepidation? I am probably less scared than the diet obsessed calorie phobic that lurks around every family. You know who I am talking about. The one that cringes with the crackle of freshly baked loaf of bread because of the carb content, or hides in the bathroom while slices of pie are being deliciously devoured. Resolutions are made at the beginning of the next year for a reason my dear readers. We work hard all year, and I think we need to reward ourselves! Being Greek, I have learned some wonderful lessons around the holidays. For instance, there are no calories on holidays. It’s true I tell you! Once you stop counting carbs and just enjoying your favorite delights, you’ll realize how miniscule a couple more ticks on that scale for one day can be. Plus, we all burn off half the cranberry dressing with a rousing game of football right?

Okay off my perch now. I am not saying to overindulge by any means by the way. Dig in with appropriate portions of course. If I can remain at ease on this holiday, I see no reason why you cannot. It’s after all, a holiday based on a feast!

So feast your eyes on

some good advice on keeping gfree guiltily below. I’ll keep you from hyperventilating at either the scale or the site of the potentially gluten gravy, and you just sit back and enjoy.

For my advice about a stress/gluten free Thanksgiving, I give you tips from my blog mentor herself, the glutenfreegoddess. I often get inspiration from her recipes, and she has had much more experience in the gfree world than I. She has written a great guide about where your gluten may be lurking. A bit from her blog below!

•Marinades and soy sauce, broth and bouillon may use wheat or barley in flavors and seasonings. Although I urge you to check your turkey for gluten-free status, most I've seen are safe- if you avoid the seasoning or gravy packet.
•For thickening gravy, whisk in a tablespoon or two of sweet rice flour or an arrowroot starch slurry. Potato flour is another choice- but be careful you don't add too much and end up with gravy you have to slice and serve. I like to add a splash of dry sherry, brandy, or wine to the gravy as well. It gives it that extra kick (and goddess knows, sometimes we need it- especially around the holidays).
•For stuffing, simply follow your favorite recipe and substitute toasted cubes of gluten-free cornbread or a loaf of store-bought gluten-free white bread. Or try my personal favorite stuffing recipe- Cornbread Stuffing with Curried Apples and Cranberries.
•For a crunchy bread crumb topping, try my Crunchy Gluten-Free Breadcrumbs (process toasted GF waffles- they make perfect golden crumbs).
•For a gluten-free mac and cheese try my Kicked Up Baked Mac and Cheese Recipe or my dairy-free Baked Mac and Cheese or my totally from scratch Cheesy Uncheese Mac and Cheese (fab for vegan guests).
•For a classic cookie crumb pie crust use Pamela's cookies (Lemon or Ginger or Chocolate, depending upon the filling) processed into crumbs; I use Joy of Cooking's classic cookie/cracker crumb recipe and simply substitute with gluten free cookies. For a butter replacement, try Spectrum Organic Shortening.
•For a gluten-free pie crust folks rave about, try Rebecca Reilly's Gluten-Free Pie Crust recipe with sorghum flour.

Read more: http://glutenfreegoddess.blogspot.com/2008/11/thanksgiving-recipes-tips-for-gluten.html#ixzz167Xdn3Mo

Thursday, November 4, 2010

A Spooky and Savory Halloween

The weather always seems to dip dramatically as the haunting hour of Halloween approaches in Oklahoma. It's as if the spirits trail into town, tipping the temperatures to make us aware of their icy presence. So how do I combat their cold weather trickery? With warm and spicy treats in the kitchen! And what is more comforting than a bowl of hearty chili, warming your heart,and sedating those ghoulish goosebumps.I have pulled my fair share of tricks in the past during the witching hours of all hallows eve, so this year I think I will just focus on the treats.

Halloween is my favorite holiday, so I was more than thrilled to host on Sunday night. It's always rewarding to entertain and satisfy a big crowd for not a big buck. This recipe is heavy on the flavor and light on the wallet. One thing that I NEVER skimp on however, is the decorating. I admit, it looks like halloween threw up in my house, and we could probably rival a Griswald Christmas, but we are festivous nonetheless.

Chili is a fall/winter crock pot staple in our house, and I always enjoy adding seasonal ingredients to any dish I dish out to you lovely readers. So here it is...a spooking spiced chili concoction I threw together in my bubbling cauldron, "Pumpkin Chicken Chili". Feel free to add more spice, if you dare...

Pumpkin Chicken Chili
•2 tablespoons EVOO
•1 small yellow onion, chopped
•1 orange bell pepper, cored, seeded and chopped
•2 jalapeños, seeded and finely chopped
•2 cloves garlic, minced
•1 ½ lbs boiled, shredded chicken
•1 (14.5-ounce) can Muir Glen Fire Roasted Tomatoes (with juice)
•1 (15-ounce) can organic pumpkin purée
•2 cups water
•2 tablespoons pumpkin pie spice
•3 tablespoons chili powder
•1 teaspoon ground cumin
•Kosher salt and ground black pepper to taste
•1 (15-ounce) can kidney beans, rinsed and drained
•1 package organic shredded mild cheddar cheese (optional topping)
•Corn tortilla strips (optional topping)

Heat the EVOO in a large pot over medium high heat. Add onion, bell pepper, jalapeños and garlic and cook, stirring frequently, until onion is translucent, about 5 minutes. Add your shredded or cooked shredded chicken and cook until browned. Add tomatoes, pumpkin, water, chili powder, cumin, salt and pepper and bring to a boil.
Reduce the heat to medium low and add kidney beans. Cover and simmer, stirring occasionally, for 30 minutes-1 hour. Ladle chili into bowls and serve. Taste test, and adjust spices to your liking.
Serve with shredded cheddar cheese, and corn tortilla strips for toppings. I also accompanied mine with my pumpkin corn muffins below.

Monday, October 11, 2010

Falling for Fall Fare

Before I begin my newest post I feel as though I must apologize to you dear readers. I have neglected you for quite some time now and I appreciate you letting me know that a new post is wanted! So, with this apology, I begin my post. Enjoy.

Fall is officially here. Beautiful bursts of red and orange are sweeping across the trees, and the air is getting crisper by the day. Football has officially taken over our television sets, and I am consistently craving grilled brats and the smell of my chiminea. I try and spend as much time outside as possible, breathing in the change of the season. And with the change of the colors and weather, a change in my menu is a must. I’m saying goodbye to the bright summer fruits and chilled cucumber soup, and hello to crisp gala apples and warm spinach and feta pie.
While I took a brief hiatus from my blog, I collected a many new delicious recipes. See, my absence alas brings new and fresh ideas to the table. Your dinner table. And hopefully a little absence made your hearts and tummies a little fonder.

I am christening fall foods with a recipe that will warm up your grilling gloves and get you game ready in no time flat. Lemon & Oregano Grilled Chicken with oven roasted, sea salt rosemary potatoes. Two very simple recipes that taste simply delicious. Both are easy to make on a week night as well. And don’t we all need more of THOSE recipes?!

Lemon & Oregano Chicken
•4 free range organic chicken breasts – pounded out
•2 lemons
•Dried Oregano
•Garlic Powder
•Kosher salt

Place chicken in a marinating dish. Zest both lemons over the top, and then squeeze the lemon juice on top. Coat the chicken on both sides with kosher salt, oregano and garlic powder. Don’t be afraid to get liberal with your spices. Grilling can burn off some of the flavor and nobody likes a bland chicken breast!
Grill the chicken until well done. Be careful to grill pretty immediately because the acid in the lemon juice begins to break down the chicken pretty quick. Serve with potatoes below!

Roasted Rosemary & Sea Salt Potatoes
•10 red skin potatoes – quartered
•2 tablespoons dried rosemary or 2-3 sprigs of fresh rosemary
•4 tablespoons extra virgin olive oil
•1 tablespoon sea salt
•1 tablespoon freshly ground black pepper
•2 teaspoons garlic powder or 3 cloves fresh garlic (finely minced)

Preheat your oven to 350 degrees.
Quarter your potatoes and place them in a mixing bowl. Add all your seasoning ingredients. Transfer seasoned potatoes to a nonstick baking dish.
Place in oven for 30-35 minutes or until golden brown and tender. Enjoy with your chicken!

Wednesday, September 8, 2010

Ladle of Love

Blame it on my immature age or immature taste buds, but I never was fond of lentils as a child. That all changed merely four years ago when I decided that they were nutricious and delicious. I give props to Cedar's Deli, a Lebanese restaurant in town, for my change of heart. From their lentil soup, to Wild Fork's lentil salad, I am now a lentil lover.

Yesterday I was struck madly with a lentil craving and decided to take the challenge into my own hands. Could I make a lentil soup that satisfied me as well as the restaurant's recipes I now hold so dear?

Yes. I could. And, I did. This is a great day to slow simmer this stew, as the weather has taken on a dreary disposition. This soup has a kick, so it should wake up those tastebuds in no time!

Lentil Soup

*1 pound lentils
*2 large yellow onions, roughly chopped
*3 leeks, chopped
*3 cloves fresh garlic, minced
*1/4 cup EVOO
*1 tbs kosher salt
*1 1/2 tbs freshly ground black pepper
*1 tsp dried thyme
*1 tsp whole cumin
*6 carrots, chopped
*8 stalks celery, chopped
*8 oz can tomato paste
*3 quarts chicken stock (or more pending your soupy preference)
*freshly grated Parmesan cheese (topping)

Directions

In a large stockpot, cover the lentils with boiling water and allow to sit for 20 minutes. Drain.

Using the same pot, turn heat to medium and add the EVOO until it warms. Add the garlic, and saute until you can just smell it's aroma. Add the onions, leeks,salt, pepper, thyme, and cumin. Saute for 20 minutes, until the vegetables are translucent and very tender. Add the celery and carrots and saute for 10 more minutes. Add the chicken stock, tomato paste, and lentils. Cover the pot and bring to a boil.

Reduce the heat and simmer uncovered for 1 1/2 hours, until the lentils are cooked through. Check the seasonings (I did not need to add anything). Sprinkle with grated Parmesan and serve!!

Thursday, July 8, 2010

Grilled for a Grilling Recipe

RIP to my husband’s grill… ashes to ashes, charcoal dust to charcoal dust. Let’s take a moment of silence.

OKAY, now raise a glass to the new grill taking up residence on our side patio! Out with old, in with the new. I think grilling out is one of my favorite activities. It's bonding, fun do with both friends and family, and is such a simple way to get a healthy meal on the table that everyone will eat.Even my picky son was delighted with this dish. Okay, okay so I don’t really do the grilling. My hubby thinks letting me around propane and an open flame would be a disaster but I design the menu and prep so I deserve some credit right? I am master at griddle grilling so I will keep that under my belt and let him deal with the more flammable fun.

My friends and family asked if we do much grilling at home, and what simple recipes do I have to share. The fourth must have given us a dose of grill fever. I made it a challenge to put together an easy 6 ingredient grilling recipe that was simple, but tasted complex in its flavors. Well, I think I have one that is as easy as it gets. I didn’t do extensive seasoning, it doesn’t involve a lot of ingredients or puttering around the grocery store franticly looking for a store bought gluten free marinade, and was on the table in 30 minutes. Excuse me for sounding like Rachel Ray there.

Marinated Grilled Chicken & Grilled Corn with Basil Butter

Ingredients

•2 large skin on chicken breasts (bone in or out is your preference)
•Daddy Hinkle’s Liquid Marinade (yes, it is gluten free!!)
•2 husks of white corn
•¼ cup yogurt butter
•¼ cup or so fresh basil
•Kosher salt

Directions

Marinated and Grilled Chicken

Poke holes on both sides of the chicken with a fork. This allows the marinade to soak into the chicken. Sprinkle kosher salt on both sides. Place chicken breasts in a freezer bag or dish, and liberally pour Daddy Hinkle’s onto the chicken. Let marinade for at least 4 hours. The longer you marinade, the better the flavor. This part can be done in the morning, and just sit and soak while you're at work.

Pre-heat the grill on med-high to high and lay the chicken breast on the grill. A hotter temperature will cook faster and sear in the juice if grilled correctly.
Grill for approx. 4-5 minutes on one side, checking frequently to make sure the chicken is not burning. The chicken is ready to turn when the bottom side has clear sear marks and the top still is pink. Flip and grill the chicken for another 4-5 minutes on the other side, depending how large the chicken cut. Firmly touch the chicken at the thickest point to see if done. If overcooked, the chicken will feel hard without any give. If undercooked it will feel a little squishy. If cooked right it should have a little spring back.
If you are unsure if the chicken is cooked enough you can make a small cut into the thickest part of the chicken. If the center is still translucent then it needs more cook time. You could also use a meat thermometer and make sure the chicken reads 165 F.

**The chicken will continue cooking after it is taken off the grill. This is when most people overcook, because they remove the chicken too late from the grill. Once it has cooked completely through it will start drying very fast.

Grilled Corn with Basil Butter

Peel back the corn husks, but do not completely remove, and clean the threads off the kernels. Tuck the corn back up into its husk.

Grill the corn in its husk for about 4 minutes on each side. Remove from grill and take out of the husks. Shave the kernels off into a bowl. Add Basil Butter (recipe follows).

Basil Butter

Chop your basil leaves. In a food processor, or with a hand blender, combine the basil and butter. Pulse until smooth, adding a little EVOO if needed. I used a hand mixer so it helped for the mixture not to stick to the blades. I know this technically adds one more ingredient but I am sure you can let it slide.