Showing posts with label gluten free bread. Show all posts

Saturday, February 23, 2013

Blankets & Blueberries


The snow is covering the ground like thick, fluffy blankets. I sit watching it breezily dust my windowsill, curled up with a mug of tea. The fireplace’s heat licks my frosty skin and I allow myself to sink into the smells coming from the kitchen. The wait for homemade baked bread is worth it, and I try to remain patient. Finally my buzzer goes off and I sprint to remove the doughy, pillow top loaf from its warm bed. Blueberry oozes out gently from the crust. I will be lucky if it tastes half as good as it looks. 

I am one very lucky girl. It tasted as beautifully as it looked. Enjoy dear readers.


Blueberry Breakfast Bread

Ingredients
  • 1 1/2 cups fresh blueberries
  • 1 bag gluten free bread mix (I used Bob Mills)
  • 1 yeast packet
  • 1 3/4 warm almond milk
  • 4 tablespoons butter, melted
  • 1/4 cup apple sauce
  • 1 large egg, 3 egg whites

Directions
Preheat your oven to 375 degrees F.

In a small bowl mix yeast and warm almond milk. Let stand for about 5-7 minutes until it begins to bubble.

In a mixing bowl add your flour bread mix, butter, apple sauce, yeast and almond milk mixture, and eggs. Mix on medium speed for 3-5 minutes. 

Gently fold in the blueberries and pour dough into a 9x5 bread pan. Cover with foil and multiple towels and place somewhere warm (about 80 degrees F). Let dough rise for 30-40 minutes. With a wet spatula smooth the surface.

Bake for one hour in the oven. Remove and let cool for 10 minutes on a wire rack.

Enjoy!

Monday, May 23, 2011

Rudi's OH-some Onion O's

My entry for Rudi's Gluten Free Cooking Contest:
Rudi's OH-some Onion O's
Gluten free, Baked, Kid and Adult Tested and Approved!

I am so excited to share with you my entry for Rudi’s Gluten Free contest. I have come up with a recipe that can be used as an appetizer, snack, or side. It can be dressed up for the party with its accompanying dipping sauce, or hang out beside you on a casual football Sunday. Whichever you choose, I can promise you that these little O’s are oh so delicious.

I wouldn’t necessarily call fried food a foe, but it is certainly not a friend of mine. For one, those oils can be contaminated and two they don’t often sit well in this Indie’s tummy. So, since I have been mastering the art of using cooking alternatives I have come up with a gluten free, healthier onion ring. Now, who can resist the leaning tower of crispy onion goodness glistening from my menu? Especially if you take out the frying and replace it with baking. A classic southern concoction that cuts calories and adds flavor is something I know that I personally cannot resist!

I experimented in the kitchen with many different ingredients and recipes. One of the challenges I ran into was deciding on which milk would bring the best flavor to the rings. I decided that since I feel better when I do not indulge in a lot of moo-cow dairy that I would use soy milk in my recipe, however please feel free to use whatever milk your little heart (or tummy!) desires.

These little O's were so delicious! I had to beat away my husband and inlaws so I could snap a picture for the contest before they gobbled them up. Yum to the last crumb!

Please go online to Facebook and vote for my recipe! The first round is based on facebook votes and I would love to have the chance to be considered by the panel of judges!


Rudi's OH-some Onion O's

Ingredients:
•2 slices Rudi's Orginal Gluten Free Bread
•2 Vidalia Onions
•1/2 cup rice flour
•Kosher Salt
•Black Pepper
•Cayenne
•Italian Seasoning
•1 tbs Canola Oil
•Olive Oil Spray
•Ground Chia or Flax seeds
•Soy Milk (or milk of choice)

Instructions
Preheat your oven to 450 degrees F.

Place 2 slices of day old Rudi's Gluten Free Bread in your food processor with 1/4 cup of rice flour. Add a pinch of salt, pepper, itlaian seasoning and cayenne. Pulse a few times then add oil. Process for about 30 seconds or until crumbly. Place your delicious homemade breadcrumbs in a shallow dish.

In a bowl combine 1/4 cup rice flour, chia egg (1 tbs ground chia and 3 tbs water), and 1/2 cup soy milk. Whisk until combined and formed into batter consistency.

Slice your onions into 1/2 inch circles and separate into rings. Wipe tears away from handling onions! Keep the larger rings and save the others for later. Place all your rings in a bowl and cover with milk, letting them soak while your oven finishes heating.

At the sound of the 'beep' dip your onion rings into the batter then the bread crumbs. Spray a cookie sheet with olive oil spray and place your little O's on the sheet. Spray the top of the rings as well so they crisp nicely.

Bake for 8 minutes then flip and bake for another 6-8 or until they are golden brown.
Serve warm and enjoy the compliments!

Tuesday, April 26, 2011

Rudi's Gluten Free Cooking Contest!

Oh yes. I feel like I am ready to put my gluten free cooking skills to the test. I was tickled when I recieved an email from Rudi's telling me all about the new Gluten Free Cooking Contest they are launching! A thousand thoughts ran through my head. Oh the opportunities, the recipes, the taste testing! I knew I needed to get started right away. Also because the contest began on April 18th. Times tickin' till June!


Here is the lowdown:
Rudi’s Gluten-Free Bakery, maker of unbelievably good gluten-free baked goods, announced the Unbelievably Good Gluten-Free Recipe Contest on April 18th. Inspired by the passion and creativity of gluten-free foodies everywhere, Rudi’s Gluten-Free Bakery fans are encouraged to share their gluten-free culinary masterpieces in the Unbelievably Good Gluten-Free Recipe Contest for a chance to win a free trip to Boulder, Colo., star in their own online cooking show and be featured in a national media advertisement for Rudi’s Gluten-Free Bakery!


April 18th through May 20, aspiring gluten-free chefs are invited to visit the Rudi’s Gluten-Free Bakery Facebook page and click on the recipe contest tab to enter. Rudi’s wants fans to get creative with gluten-free bread and some ter-RUDI-ific gluten-free recipes. There are only two recipe requirements:

1. The recipe must be gluten-free.

2. The recipe must include at least one product from the Rudi’s Gluten-Free Bakery line (Original, Multigrain and Cinnamon Raisin Breads, Multigrain Hamburger Buns and Hot Dog Rolls, and Original Pizza Crusts).

All types of recipes are welcome, from kid-approved options to fine dining fare. Along with the recipe, Rudi’s wants to hear why gluten-free cooking is important to the aspiring chef.

“We created Rudi’s Gluten-Free Bakery to help people suffering from celiac disease and gluten intolerances enjoy great tasting, healthy baked goods that have the same taste, texture and appearance of regular options,” said Doug Radi, vice president of marketing for Rudi’s Gluten-Free Bakery. “We’re continuously amazed by the culinary creativity, passion and inspiration within the gluten-free community, and we can’t wait to see the exciting ideas our fans cook up. We’re looking forward to meeting the top three finalists in June for a gluten-free recipe showdown and celebration.”
Recipe submissions will be accepted until May 20, 2011, and online voting will continue through June 6, 2011. The top 10 fan favorites, determined by the number of Facebook votes, will each receive a $250 gift card to Williams-Sonoma, an assortment of Rudi’s products and swag, and a chance for their recipe to be chosen as a top three finalist.

From the top 10 fan favorites, three finalists will be determined by a panel of judges including:

· Chef Jeffrey Barbour, Restaurant 4580

· Martin Hammer, owner of Restaurant 4580

· Chef Dan Kohler from Renegade Kitchen and Alternative Appetites

· Jane Miller, CEO of Rudi’s Gluten-Free Bakery


The top three finalists will receive a trip for two to Boulder, Colo., home of Rudi’s Gluten-Free Bakery, where they will compete in the Final Recipe Cook-Off at Restaurant 4580 on June 24, 2011. The grand prize winner will star in a National Foundation for Celiac Awareness – Alternative Appetites cooking show with Chef Dan Kohler of Renegade Kitchen and be featured in a national media advertisement for Rudi’s Gluten-Free Bakery. For complete contest and prize details, visit the Rudi’s Gluten-Free Facebook page and click on the Recipe Contest tab.

Dates to Know:

· April 18 – May 20: Recipe submissions accepted on the recipe contest tab on the Rudi’s Gluten-Free Bakery Facebook page

· April 18 – June 6: Online voting open to the public

· June 7: Top 10 fan favorites announced

· June 7 – June 13: Top 10 fan favorite recipes reviewed by panel of judges

· June 13: Top 3 finalists announced

· June 24: Top 3 finalists compete in Final Recipe Cook-Off at Restaurant 4580 in Boulder, Colo.


A bit about Rudi's...

Rudi’s Organic Bakery, Inc., founded and headquartered in Boulder, Colo., is the only nationally available brand offering a full line of certified organic bread and baked goods. Rudi’s Organic Bakery has a long history of baking bread a better and brighter way, by using simple organic ingredients that contain no artificial ingredients, preservatives, high fructose corn syrup or trans-fat. Since 2005, Rudi’s Organic has been a part of Charter Baking Company, Inc., a portfolio company of Charterhouse Group, Inc. Rudi’s Organic is a premier organic brand with distribution throughout the U.S. in both natural foods stores and mainstream supermarkets. Founded in 1976, Rudi’s Organic offers small batch organic artisan breads, sliced sandwich breads, wide pan sandwich breads, hamburger and hot dog buns, wraps and a popular line of organic spelt breads, buns and tortillas. In July 2010, Rudi’s Organic Bakery launched a new line of natural gluten-free products under the Rudi’s Gluten-Free Bakery brand. Follow Rudi’s Gluten-Free Bakery on Facebook, Twitter, and Rudi’s Gluten-Free Blog, Baked on the Bright Side.
 
If you want to learn more about the contest, company or products, you can visit them online at http://www.rudisglutenfree.com/
 
 
I am very excited to concoct some gluten free goodness in my kitchen and enter my recipe! I will be leave for Europe in a couple days and cannot WAIT to bring back some recipe souvenirs ;) Hope to have all your support in my endeavour and I look forward to providing you with a delicious new recipe!

Tuesday, March 29, 2011

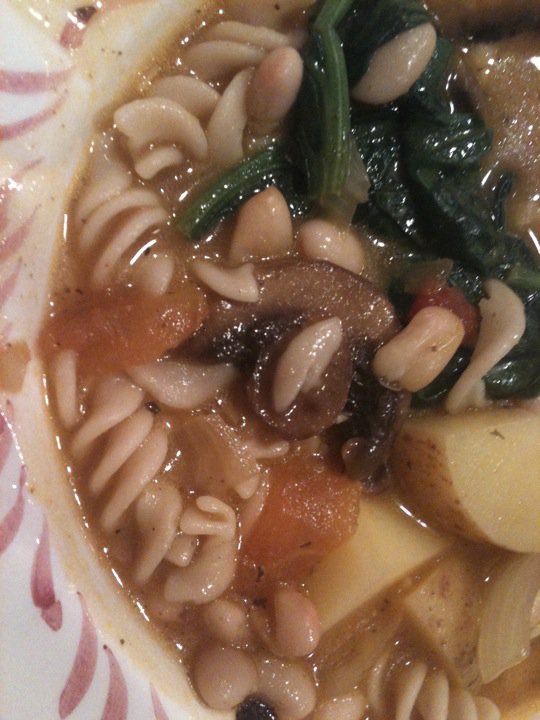
Grey Days, Souper Comfort

Springtime storms are officially here. It is another gray and rainy morning here in Tulsa. I keep reminding myself that the heavy clouds are pouring colors into our dreary surroundings. I am happy to see the lavender buds on the trees, and the pops of white petals drifting in the warm breezes. This morning I have yet to fully awake as I write but alas I do have to be at work early this week so I have no choice but to wipe the sleep from my eyes and begin. So bear with these stiff fingers and clouded mind as I share with you a delicious vegan soup!

Ah soup. Such a perfect comfort food. I have been on many soup binges in my life I must admit. Hey, don’t judge, we can’t help what we crave sometimes. It could be a hundred degrees, humid, and sweltering, and my soup fix could get me itchin’. Maybe because it is such a versatile little bowl of nutrients. Or the fact that it seems to warm my tummy and easy my troubles simultaneously.

Regardless of why I crave it, it’s important that I pay attention to what kind of soup I am eating these days. And not just because of the lurking gluten monster disguising itself in the ingredients. Canned soups can pack a ton of extra sodium that makes my joints cry out with swollen sobs. Plus, who wants UFI’s (unidentified floating ingredients) in their bowl? Well, not me. But hey, if you’re comfortable teetering that Area 51 line go right ahead! It’s not to say that I haven’t divulged in a cup of Ramen in my day. Now I just am aware of how puffy I plump with the additives so I think I personally will steer clear. Maybe it was also a sign when I managed to catch my ramen noodles on fire in the sorority house microwave. No water = flames. See, we all have to grow our “natural” cooking skills from somewhere.

My remedy to the soup equation I have rolling here would be to make your OWN soup! That is much more satisfying anyway right? I looked at a ton of soup recipes over the weekend and managed to settle on my one to share. My past soups were good, but I wanted to try something new for you. A couple blogs mentioned this stew, and after a couple of my own little tweaks I think it was PERFECT! I am thrilled also because it makes a lot so I have a comfort food dinner to last me through the next gray days.

Here is the original recipe below, and you can find my changes in the notes. I had to take in account some g-free factors of course in my recipe and directions. Both I am sure are delicious and nutritious.


Kathy's Veggie (vegan) Pasta Stew

  • 4 ounces sliced mushrooms
  • 1 medium tomato
  • 1 large sweet onion
  • 1/4 cup extra virgin olive oil
  • 1/2 tsp pepper
  • 
    I think a better camera is in order...
    
  • 1 tsp garlic powder or 2 Tbsp chopped fresh garlic
  • 2 bay leaves
  • 4 cups vegetable broth
  • 
  • 1 cup water
  • 2 Tbsp Italian Herbs
  • 1 potato, diced
  • 1/3 cup nutritional yeast or 1/4 cup vegan cheese
  • 1 cup dry fusilli pasta
  • 1/3 cup leftover roasted tomato salsa
  • 2 Tbsp apple cider vinegar
  • 1/4 tsp salt (or to taste)
  • 1 can of beans, drained (I used white cannellini beans)
  • 6 ounces leafy greens (spinach, kale, chard, collard..)
optional: a few dashes of cayenne for added heat.


Directions:

1. In a large soup pot, add the onions, tomato, mushrooms, garlic and olive oil. Stir and saute for about 5 minutes, until the onions become translucent.

2. Add in all the remaining ingredients (except the beans and leafy greens). Bring to a boil, then reduce to a simmer and cover with lid. Allow to simmer for 20 minutes. Do a few taste tests midway through and check on the salt/spice levels.

3. When you are just about ready to serve the soup, you can add in the beans and greens. Adding the last keeps them tender and not mushy. If you want your greens a bit more hearty, use kale or collard. Spinach wilts very easily.

4. Serve warm! With a nice slice of crusty bread.


My changes to the Recipe:

  • 4 ounces sliced mushrooms – I used a blend pack of portobella, cremini and shitake
  • 2 small/medium vine tomatoes
  • 1 large sweet onion
  • 1/4 cup extra virgin olive oil
  • 1 tbs pepper
  • 2 cloves of garlic, minced
  • 2 bay leaves
  • 4 cups organic, low sodium vegetable broth
  • 1 cup water
  • 2 Tbsp Fine Herbs
  • 3 Yukon gold potatoes, chopped
  • ¼ cup vegan cheddar
  • 1 cup dry gluten free fusilli pasta
  • 1 tbs kosher salt (or to taste)
  • 1 can of beans, drained (I used white cannellini beans)
  • 6 ounces leafy greens – I used a large bunch of fresh spinach since it cooks down
I added a tbs or so of Cajun seasoning to bring out the flavor and spice.

Directions:

1. In a large soup pot, add the onions, tomato, mushrooms, garlic and olive oil. Stir and saute for about 10 minutes, until the onions become translucent.

2. Add in all the remaining ingredients (except the beans, pasta and leafy greens). Bring to a boil, then reduce to a simmer and cover with lid. I transferred to my crock pot and let it simmer on low for 40 minutes. Do a few taste tests midway through and check on the salt/spice levels.

3. While your soup is simmering, cook you gluten free pasta to al dente. With the potatoes begin to soften, about 30 minutes, add in your pasta to the pot.

4. When you are just about ready to serve the soup, you can add in the beans and greens. Adding the last keeps them tender and not mushy. If you want your greens a bit more hearty, use kale or collard. Spinach wilts very easily.

5. Serve warm! I toasted Food for Life’s gluten free rice bread in the oven with a drizzle of olive oil and a dash of Cajun spice to accompany the soup.

Wednesday, March 23, 2011

Burger. What's in a Name?

What's in a name? That which we call a burger by any other name would smell as savory…


Burgers. We all love ‘em. And that is exactly what was on the menu last night! But like dear Juliet portrayed in her soliloquy, this burger is far more than its mere given title. This is not your meat packed patty that pops in your noggin when you hear ‘burger’. No, this burger is better is better than that. Yes, I am calling you out. My burger is better than your burger.

Nanner Nanner Boo Boo.

This burger is packed with protein, and oh was it delicious! I saw the recipe on “Oh She Glows” and knew that my first homemade veggie burger would be this one. A couple gluten free adaptions and we were ready to go! Obviously these can me made with non gluten free ingredients as well. So let’s bust out the food processor and start patty cakin’ those veggie patties together. Oh and if your grill has not shed its winter cover, no worries! These are baked to goodness in your oven!

Vegan & Gluten Free Lentil-Walnut Burgers

Ingredients:
• 3/4 cup lentils, picked over and rinsed
• 3/4 cup walnuts, toasted
• 1 piece gluten free bread, toasted OR 1/3 cup GF breadcrumbs
• 1 tsp ground cumin
• 2 tsp ground coriander
• 1/4 tsp red pepper flakes
• 3 cloves garlic
• 1/4 tsp sea salt
• Freshly ground pepper
• 1 tbsp extra virgin olive oil
• 1 chia/flax egg (1 tbsp ground chia or flax + 1/4 cup water)

Directions

Preheat oven to 350F. In a small bowl make the chia or flax egg and set aside. Place lentils in a small pot and add a couple cups of water. Bring to a boil and simmer for about 25 minutes. Remove and rinse in colander.
While the lentils are cooking, toast the walnuts by placing the walnuts on a baking sheet and cooking at 350F for about 12 minutes until golden brown and delicious. Let cool.

In a food processor, process the garlic, walnuts, toasted bread OR breadcrumbs, garlic, spices & seasonings until combined. Now add oil and lentils and pulse until coarsely chopped (some lentils should be visible and left chunky). Add the flax or chia egg and pulse a bit more until combined.

Now shape 4 patties with hands and place on a baking sheet lined with parchment or a non-stick mat. Bake at 350F for 20-22 minutes on each side for a total of 40-45 mins. bake time. Makes 4 patties. Adapted from Martha’s Great Food Fast Cookbook from the Blog Oh She Glows.

We topped ours with fresh spinach and ripe tomato. The tomato is a must! I was planning on adding guacamole but they had over ripened. But no worries, we have 2 left for tonight and I am headed to the store at lunch to pick up some avocados!

Our burgers didn’t need the whole 22 minutes once they were flipped. I was being careful that didn’t turn out too dry either. Make sure that you make your patties even. If the ends are thinner they are likely to dry out an burn. Nobody wants a burned burger.

I have yet to find a Vegan & Gluten Free Bread or Hamburger Buns so unfortunately I strayed from my vegan diet last night. One step at a time. I have cut out milk and cheese. Eggs were baked in this bread but I have been cutting them out otherwise. If you know of any gluten free/vegan breads let me know!

I cannot wait to experiment with different recipes after making this one. Of course I will be changing it up and posting new ones for you!

Monday, February 7, 2011

Cabin Fever Sandwich

A sandwich used to be an easy meal to whip up in the kitchen. A couple slices of bread, turkey, a bit of cheese, lettuce, spicy mustard…You get the picture.


Now picture this- waiting for your loaf of bread to thaw so you can break 2 slices off, then toasting to warm the bits of ice off and completely thawing, then adding everything between the slices. A panini takes longer, a simple grilled cheese can be botched easily, and the whole time you hold your breath that the piece of bread doesn’t fall apart.

This has been my journey through bread. I have taste tested and experimented a lot in the kitchen with this simple yet fickle food and finally settled on a few different bread brands that work with me and not against me. Rudi’s and Udi’s both have served me well on many occasions. San Juan 5 grain has done me right too. I don’t HAVE to freeze them either! I do because I don’t eat bread too often and I don’t want to waste, but I can pull a couple slices fresh out of the bag now if I wanted to. It’s wonderful I tell you. And these breads don't require a gym workout to be able to break apart the slices when and if you decide to freeze them.

Sounds silly to admire something so simple sometimes, but when you’re gluten free it’s the little blessings you begin to count. I have developed a great appreciation for food and what I put into my body. I’m a laborious label checker, to avoid gluten and over processed foods and I aim to eat calories that will benefit me and my life.

That said, I promised some recipes using Rudi’s gluten free multigrain bread. Last week I was snowed in so I was able to whip up some delicious meals. It was very hard to choose just one, but I did. Sorry, leaving you wanting more I know. I will post more though, don't you worry your sweet little heads my dear readers.

This sandwich truly is a bit of an “everything but the kitchen sink recipe”. Or more relative to my actual situation, “what I could rustle up in my almost barren pantry from being snowed in recipe.” As I perused my potential pantry contenders I began formulating a delicious, warm, hearty, and open faced lunch. Here you go!

Baby Bella, Spinach, & Toasted Pine Nut Open Faced Sandwich

(Told you it was a doozy!)

• 1 cup Baby Portobello mushrooms, sliced

• 1 clove garlic, minced

• 2 cups raw organic spinach

• 2 tbs EVOO

• 1 tbs Balsamic Vinegar

• ¼ cup toasted pine nuts

• Pinch of Oregano

• Pinch of Rosemary

• Salt and pepper to taste

• Freshly grated parmesan

• ¼ -½ cup Marinara


Directions:

Toast your 2 slices of bread and set aside.

Place your pine nuts on a small cookie sheet, and toast in the oven for about 5-10 minutes at 350 degrees or until lightly golden brown. Remove and set aside.

In a small sauce pan heat the olive oil on medium heat. Add garlic and stir until fragrant. Toss in your mushrooms, coat, and sauté until soft (5-7 minutes). Add you balsamic vinegar and mix to coat then toss in your spices.

Add in your spinach a handful at a time (your pan will be crowded but it will cook down quick). Keep adding until all your spinach is mixed in and cooked down. Remove from heat.

Spread your marinara evenly on your bread. I had leftover Classico Marinara from the pasta I cooked up the night before so whatever you have or tickles your taste buds. Top with freshly grated parmesan that will melt when the warm veggies hit!

Put your delicious spinach and mushroom mixture on top, and sprinkle your pine nuts over the sandwich.

ENJOY!